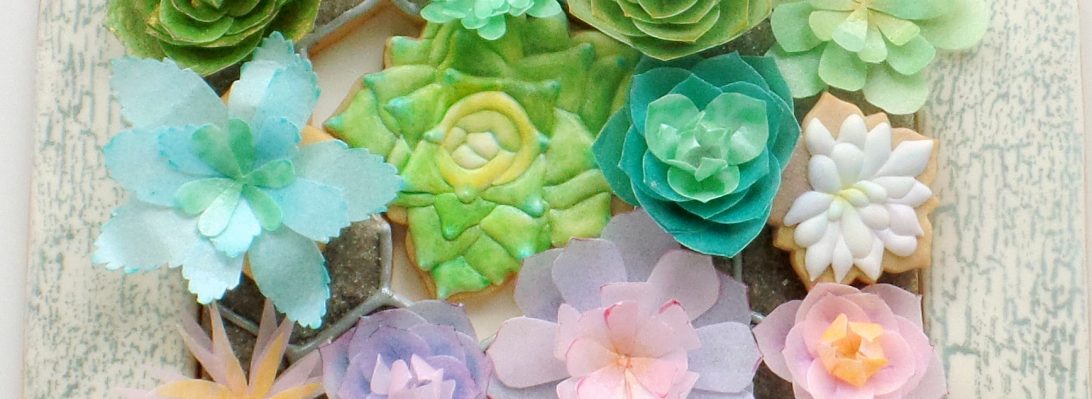
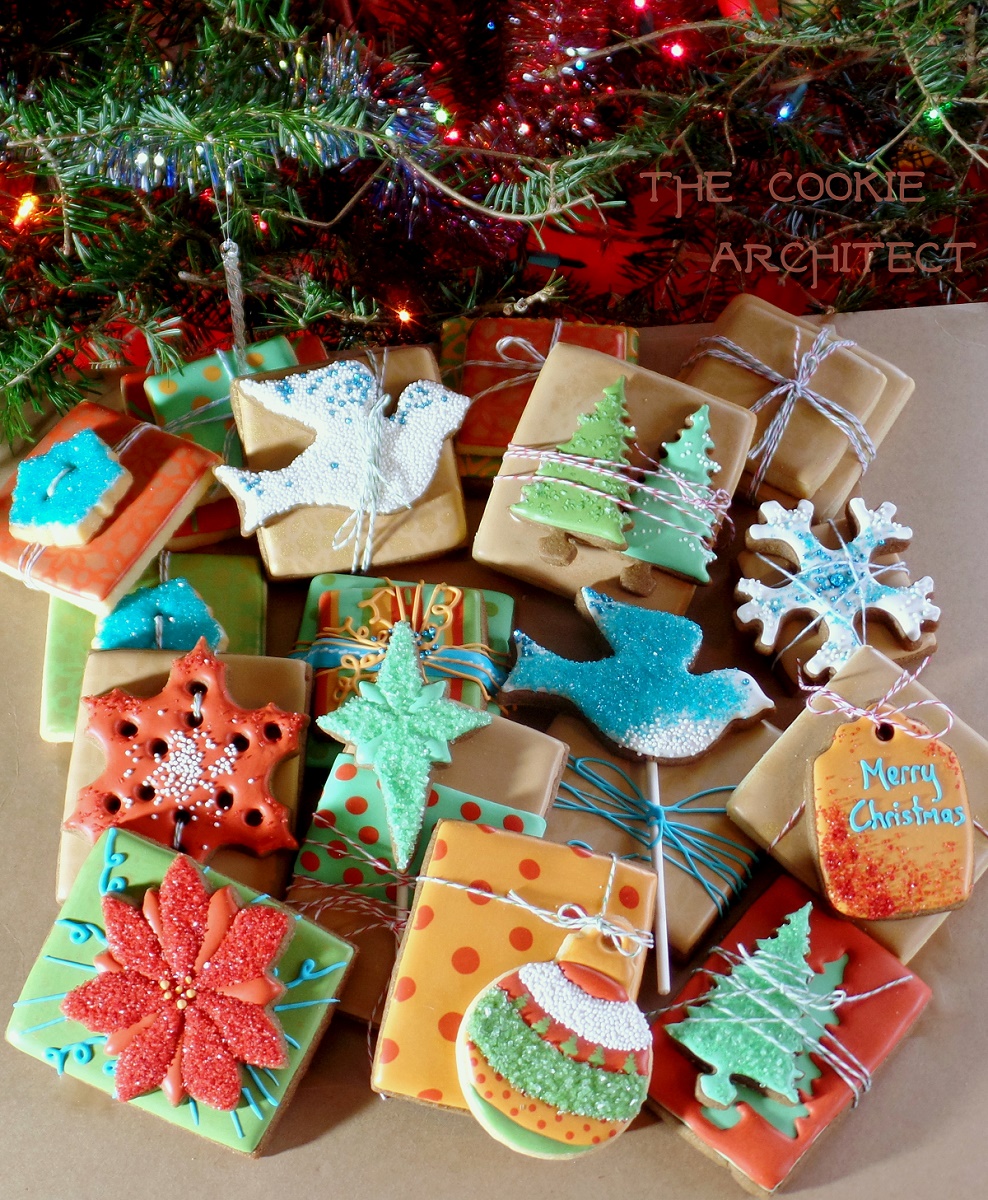
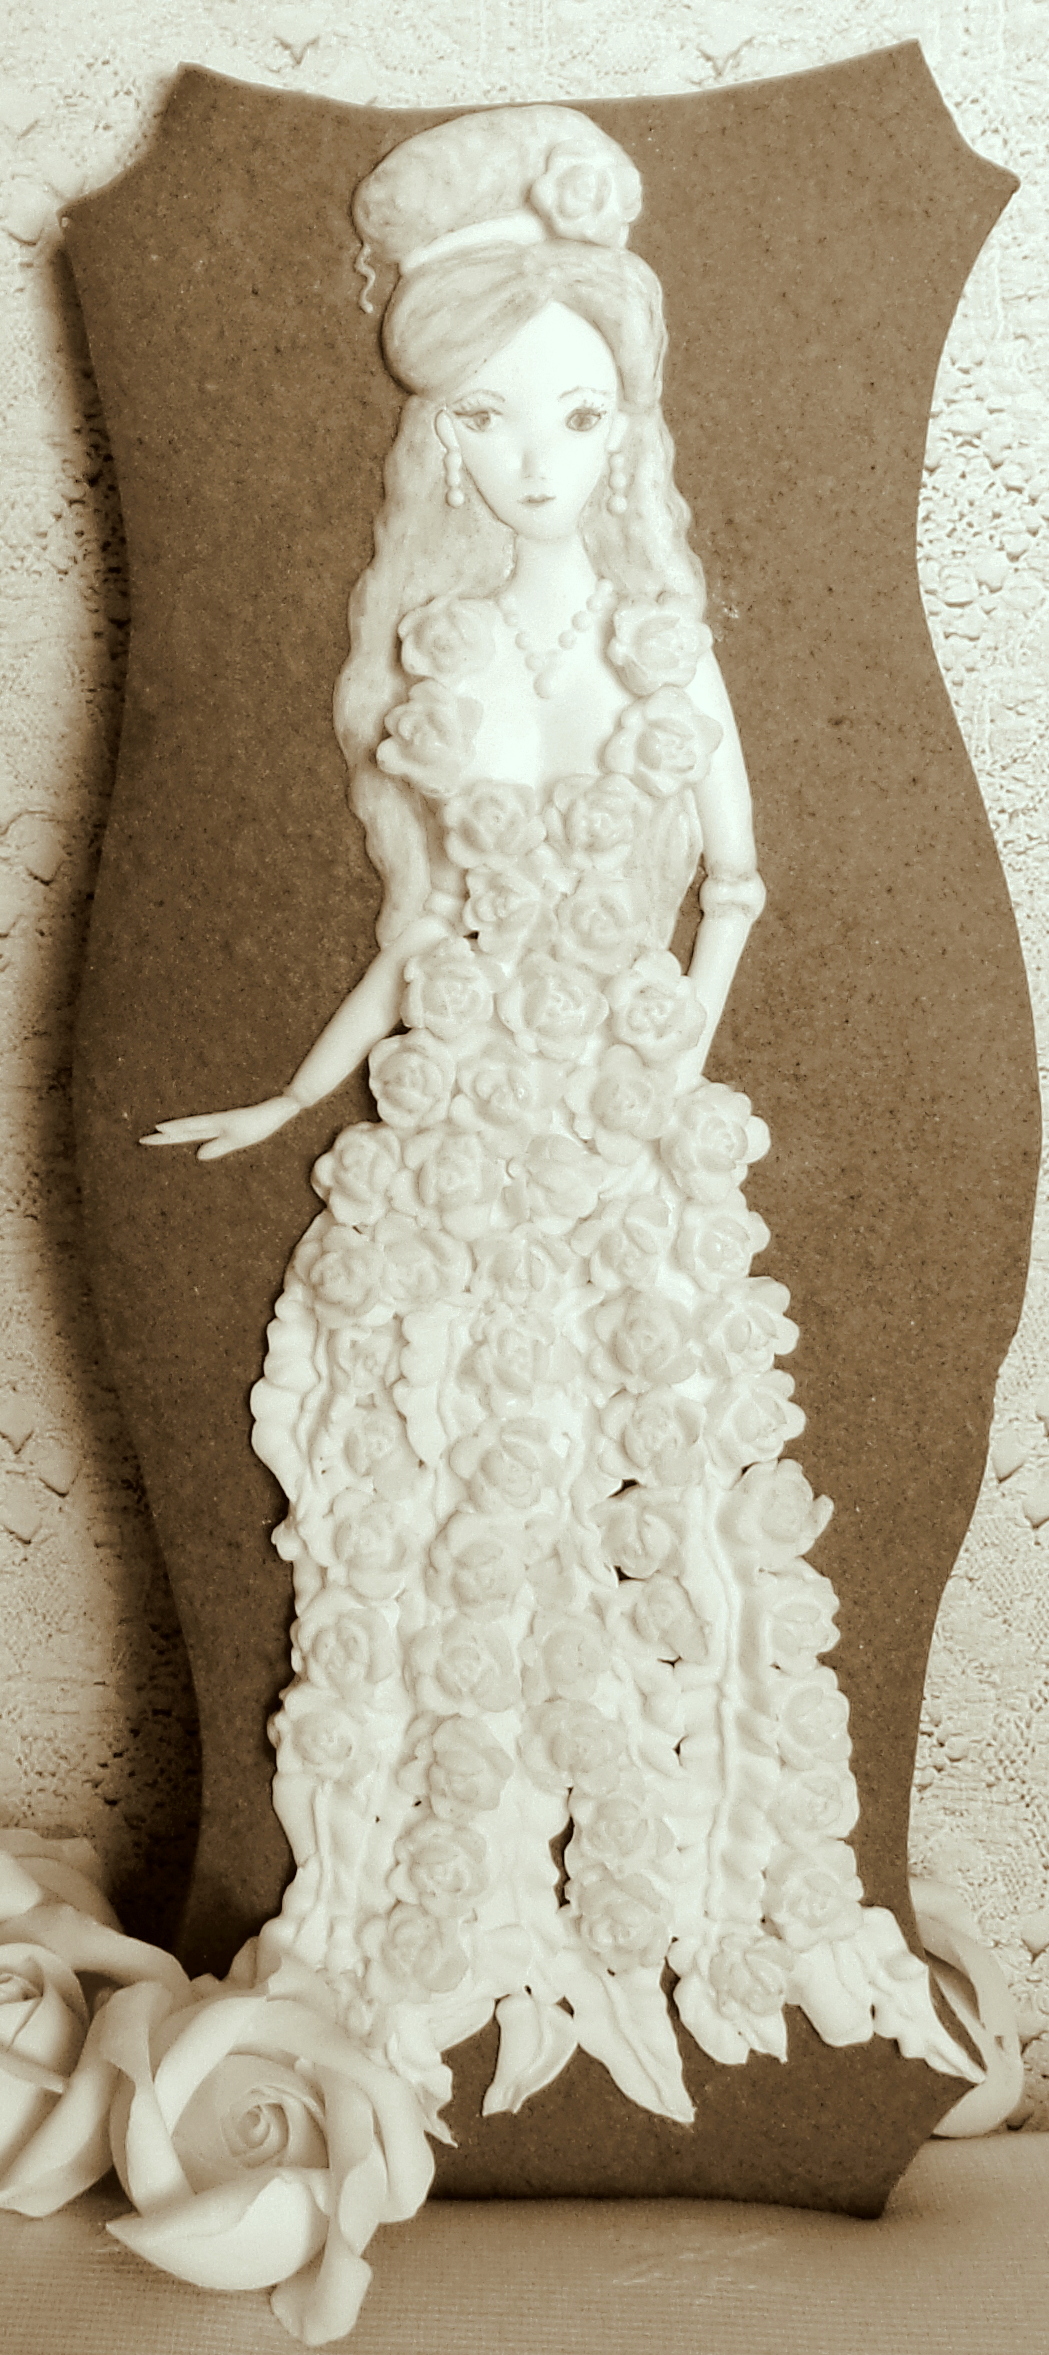
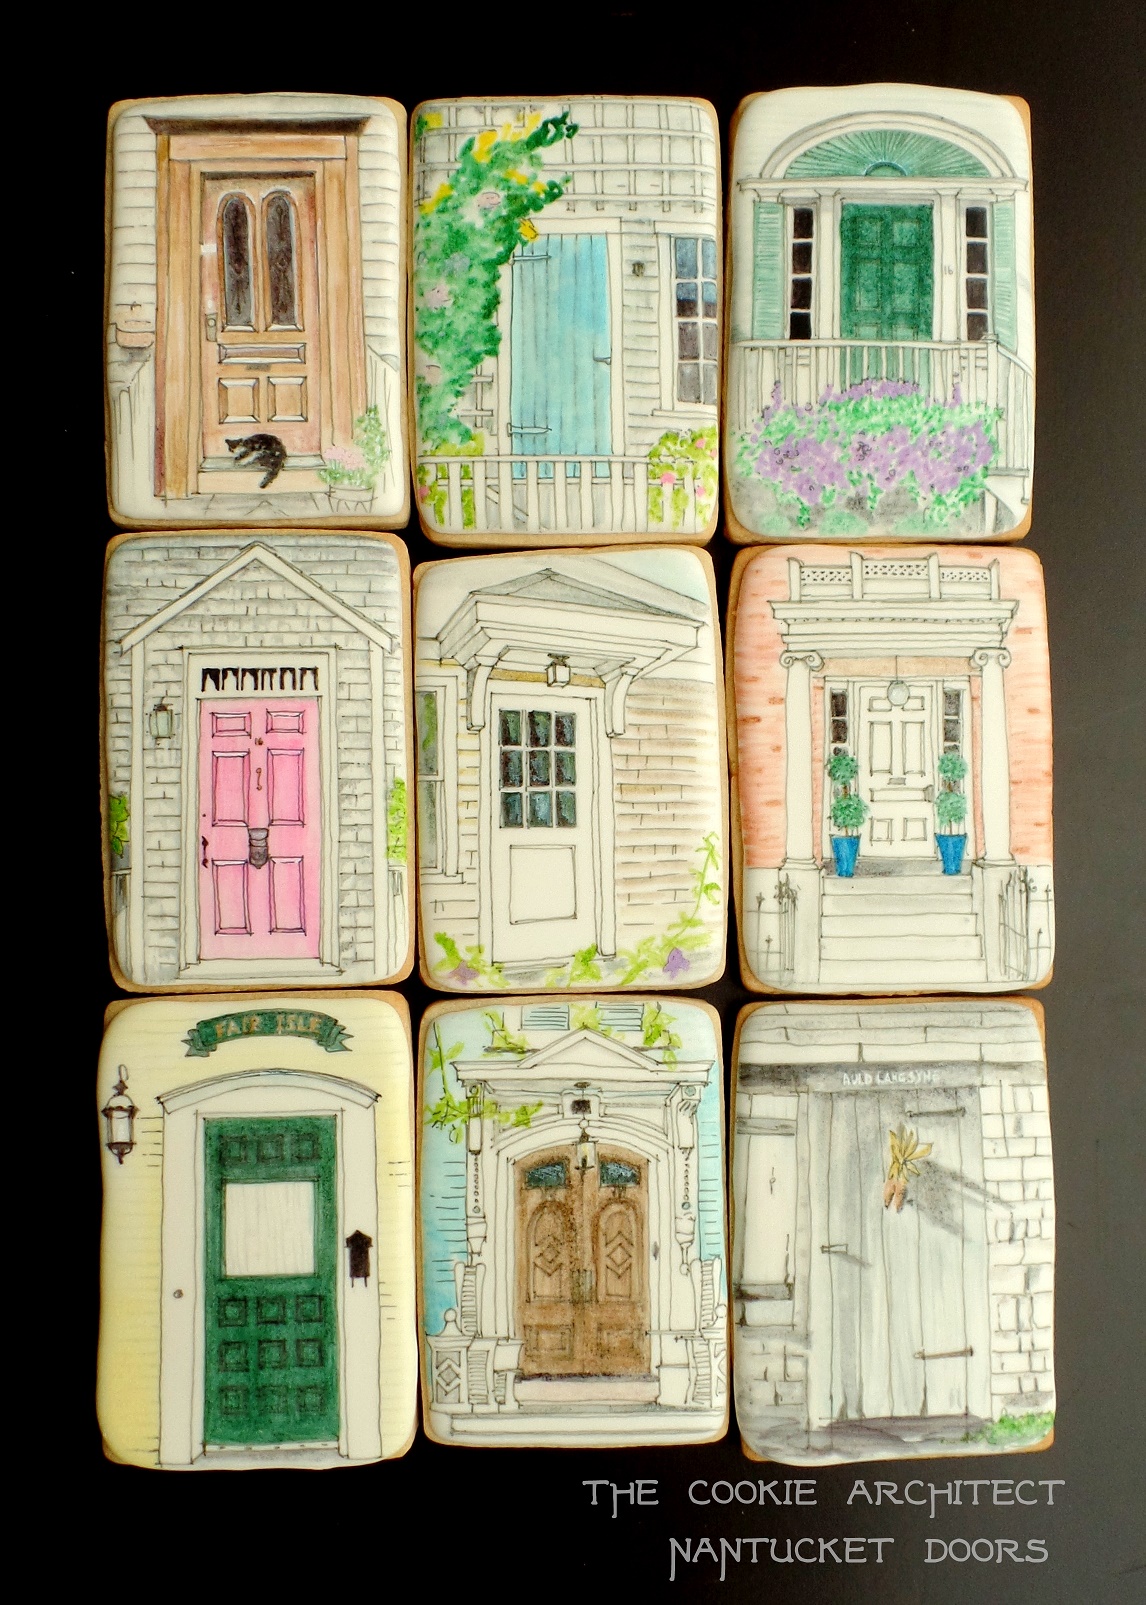
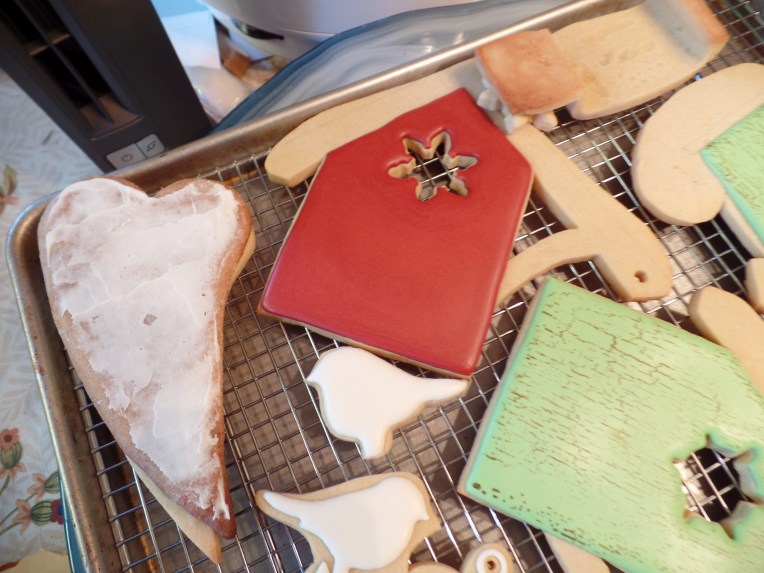
Hi everyone! It’s been a while since I’ve been working on new cookie projects, mostly because I am working on building my architectural business. But I thought I would keep my portfolio up to date on this website. I’ve just added loads of pics. Here is a sampling of the projects I added, it’s an eclectic mix. More in the gallery, check them out if you want!
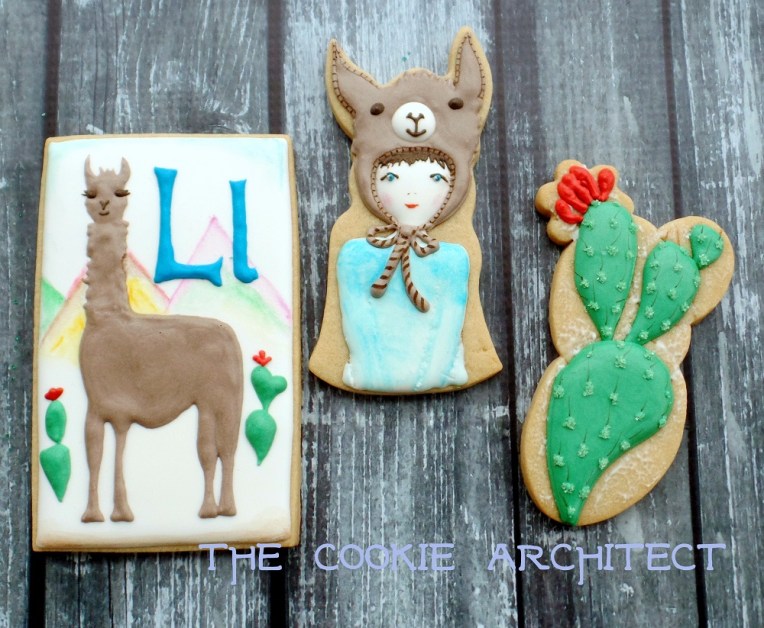
I saw a llama on a kid’s Christmas tshirt. And somehow, that’s all it takes around here to end up up to your eyeballs in llama cookies. At first, they were going to be llama Christmas cookies, but as usual, my Christmas was too busy to make all the cookies I wanted to make.
When I posted on Instagram my sketches of llama Christmas cookies unmade, my friend Aime of The Painted Pastry commented that she too had almost made llama cookies! And I thought that was even more of an amazing coincidence than if we had somehow both managed to make our llama Christmas cookies instead of just wandering around singing fa-la-la-la-llama to our families.
So we got to talking and she convinced me that I (ahem, she) needed official llama cookie cutters, and well, you don’t have to twist my arm too much when it comes to cookie stuff! I hatched a plot to make my next set of cookies all about llamas (and the even cuter alpaca). I also called up one of the great cookie cutter printers, Tracy of Whisked Away Cutters and asked her if she could make me some llama cutters! Luckily for all of us, she said yes! And she also very generously sent me two sets of the cutters so I could share one set with you guys!!! Giveaway info at the end of the post!
I’m really excited about how these turned out!!! Making the sketches was so much fun, and you could really do so many variations. You could also frankencookie a hump on to the back of the llama to make a camel, or add hats to the Llama faces or you name it!! Need help with some tips on how to frankencookie (ie put two cutters together to make a new cookie design)? Be sure to check out Lilaloa’s really cool Craftsy class that covers just that!
Here is the set I made to take my new cutters for a spin. A llama themed baby set for a cookie friend who just had a new baby. Well, they were to surprise her before the baby was born, but then he came six weeks early and now he wants to eat them all himself. 😉
And here is the additional little girl cookie I made wearing a llama hat. Because, llamas.
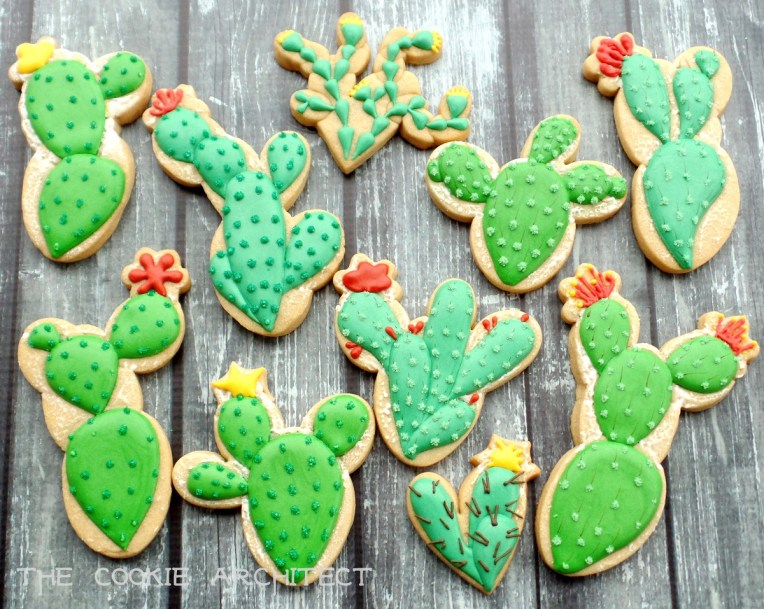
And as if that wasn’t enough, I also made cacti. Because I was forever seeing cacti in llama stuff online. But further reflection has me wondering if cacti really are a big feature of their Peruvian habitat. Oh well, I like the way these turned out!!
Check out all of the pictures of my cookie llama and alpaca, and all of my cookie pictures in my cookie gallery. I had lots of fun trying out different methods of llama fur. White chocolate sprinkle alpaca was my favorite. And I still want to try a few other techniques, but suffice it to say there are lots of options.
And if you’ve made it this far and you still want a chance to win these llama cutters, just use the Rafflecopter widget below, and also leave a comment on my blog post about what sort of blog posts you want me to write about. Because I am trying to spend less time on FB, and more time hanging out with my peeps over here. So if you want to know the latest and greatest, be sure to follow me here too!
Also- bonus question and chance to win- is a question about cookie classes. I still have a few spots left in my Montreal classes in April at the Kitchen Jukebox, but I’d love to know what topics would be popular for future classes too!!
To enter please click on this link to enter via Rafflecopter, and then come back here to leave your comments. Comment and Rafflecopter entry are both necessary to win! Shipping in US and Canada only. Giveaway ends Friday at midnight EST.
Giveaway is over and our lucky winner Beth is getting new llama cutters from me! Thank you to everyone who participated, you’ve given me lots to think about as I work on blog posts and classes!
Hi Faithful Subscribers!! Due to a weird timing issue, my future scheduled post was briefly posted on the site and you all got an email about my llama cutter giveaway. That giveaway is still going to happen, but the rafflecopter won’t be live until Midnight on the second, EST. So stay tuned. And cross your fingers this whole rafflecopter thing works then too, haha!
Hello Everyone!! It’s been too long, again. One of my New Year’s cookie resolutions was to post more on the blog. I talked about my cookie resolutions, my cookie puzzle process and my real job and family in a really in-depth interview with Julia Usher on Cookie Connection this month. If you don’t already know more about me than you want to, you should check it out!
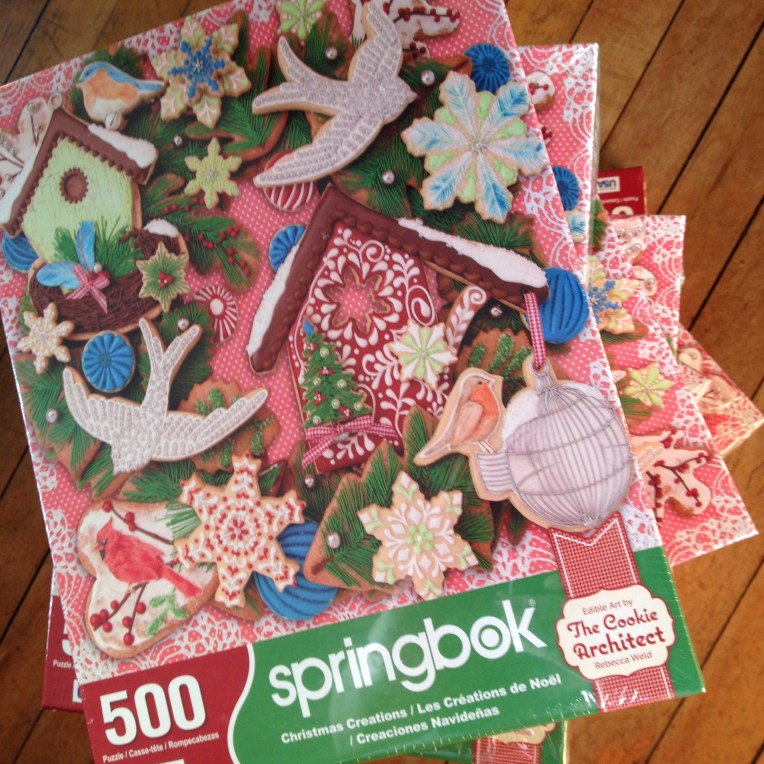
I am starting this year’s blog adventure with a post I meant to do months ago. You know, like before Christmas? It’s a photo essay showing the process from inspiration to completion and beyond of my Christmas jigsaw puzzle for Springbok. (In a total aside, if you have done the puzzle would you please consider leaving a review on their website?).
The thing I didn’t realize until I put it all together is that in typical Cookie Architect form, I did not get good photos of the ornament and bird cookies while they were in process. That’s because I did most of them in a single sleepless weekend where I barely ate, let alone took photos and that sort of thing. I do from time to time get to share the whole process, but this time there is that little gap! Otherwise, lots of never before seen behind the scenes cookies!
I’ll have another blog post very soon- some fun announcements to make about…classes!! You guys are the best! Leave me a comment and let me know you stopped by. 🙂
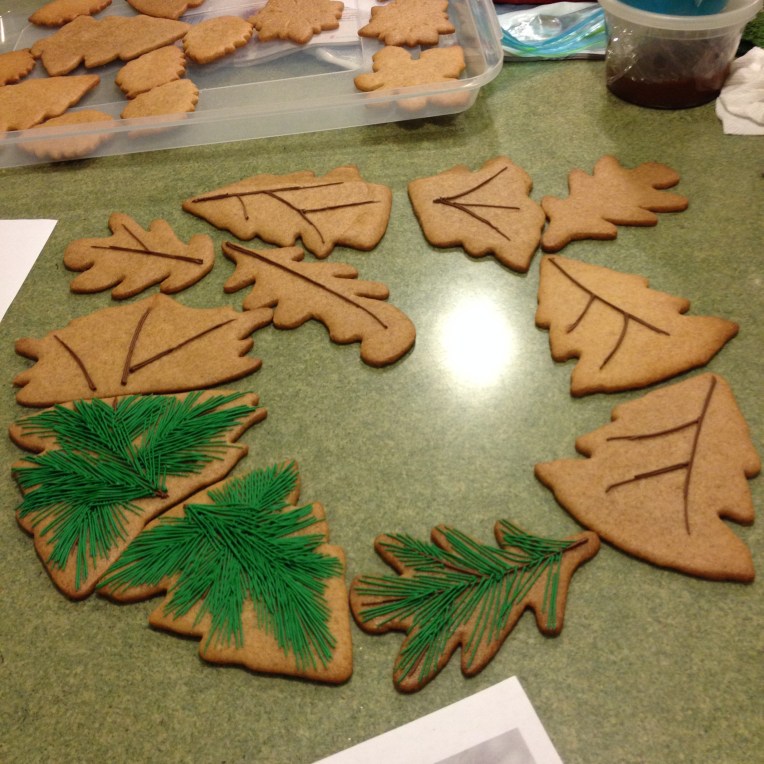
Many Inspirations throughout the process.
Starts with a color sketch.
Lifesize sketch and cutouts to establish relationships and cookies needed.
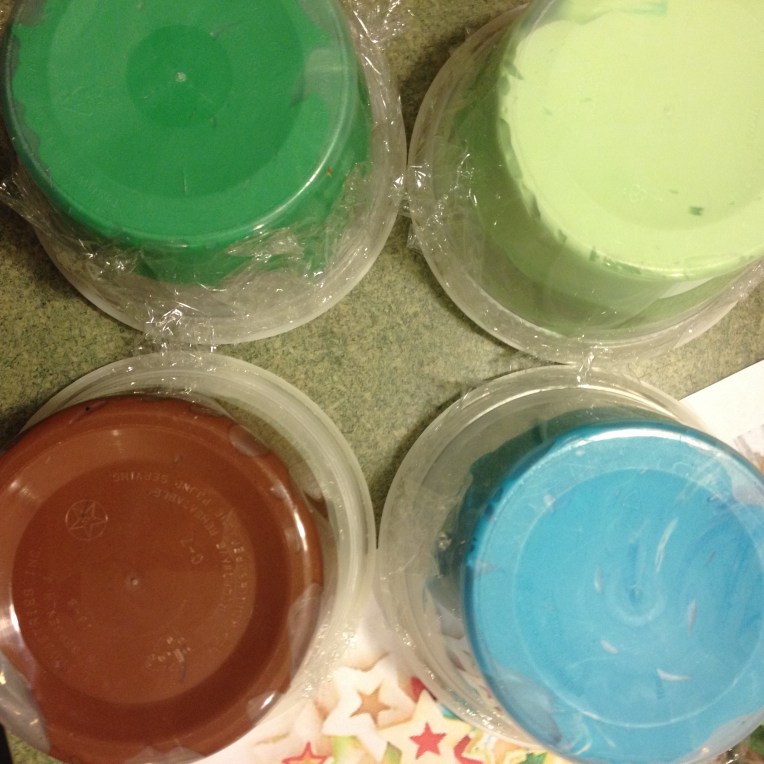
Color Palette Chosen and Sprinkles purchased. Some given to me by How Sweet is That!
More planning for wreath placement of items.
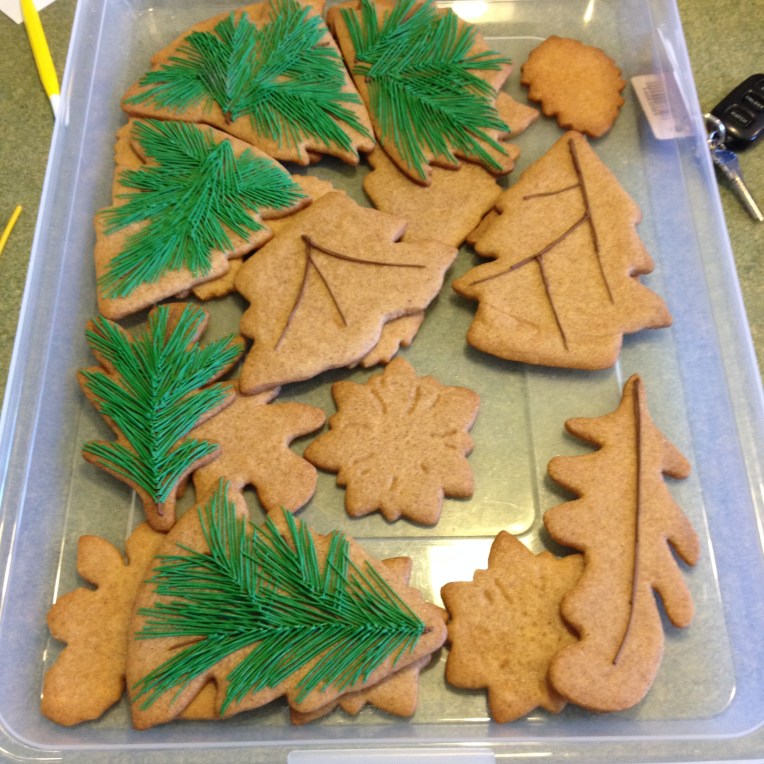
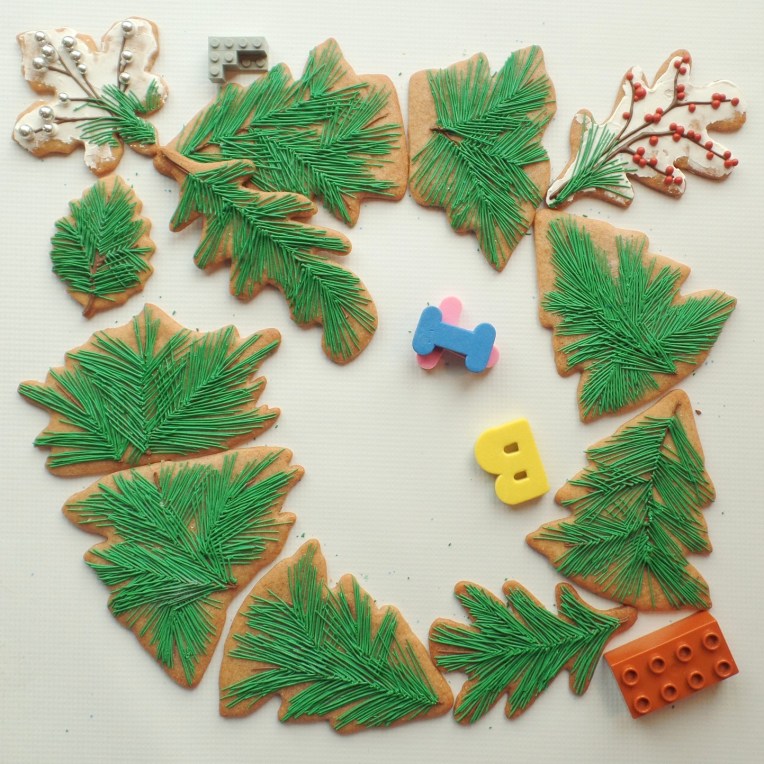
All of the un-iced greenery elements.
Icing mixed.
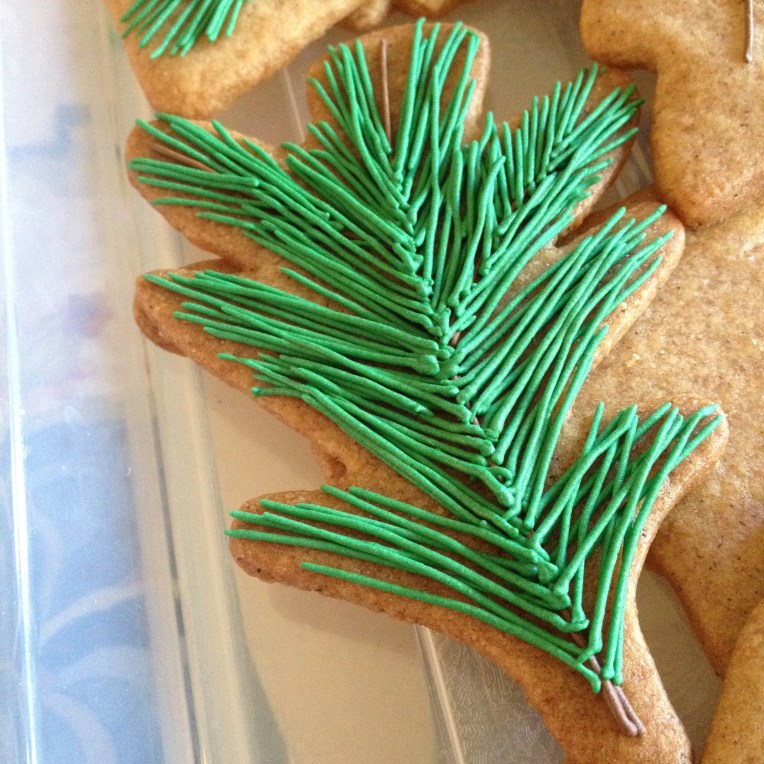
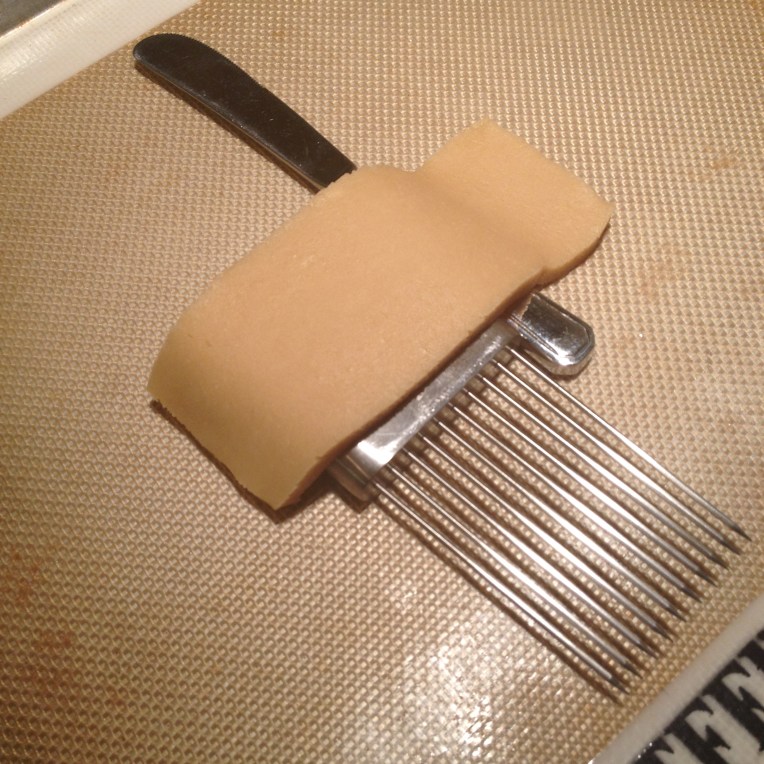
Building up the branches one needle at at time.
Lots of needles,
and branches, and needles
and more needles and more branches.
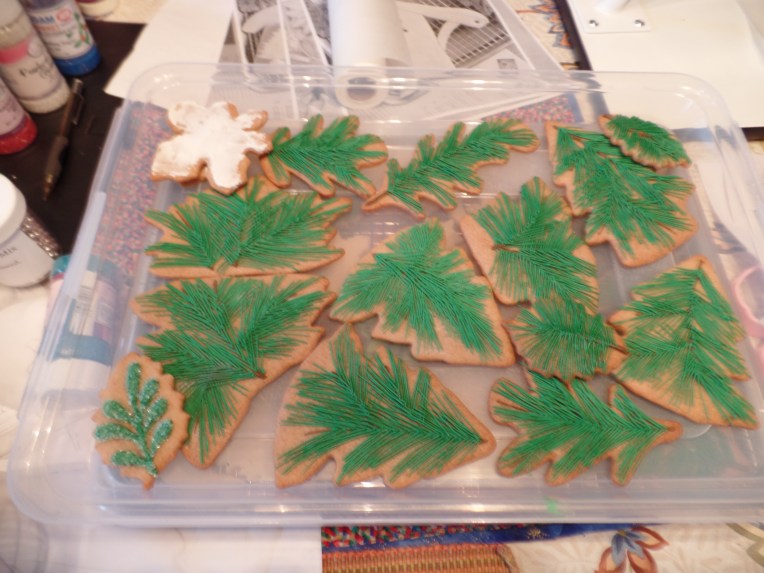
Visualizing as I went.
Loved how these turned out!
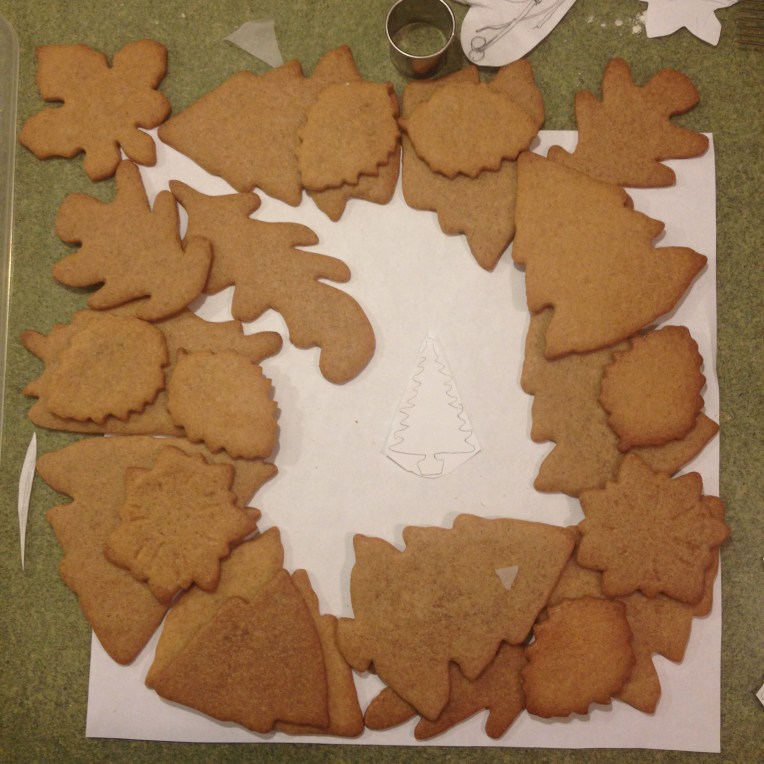
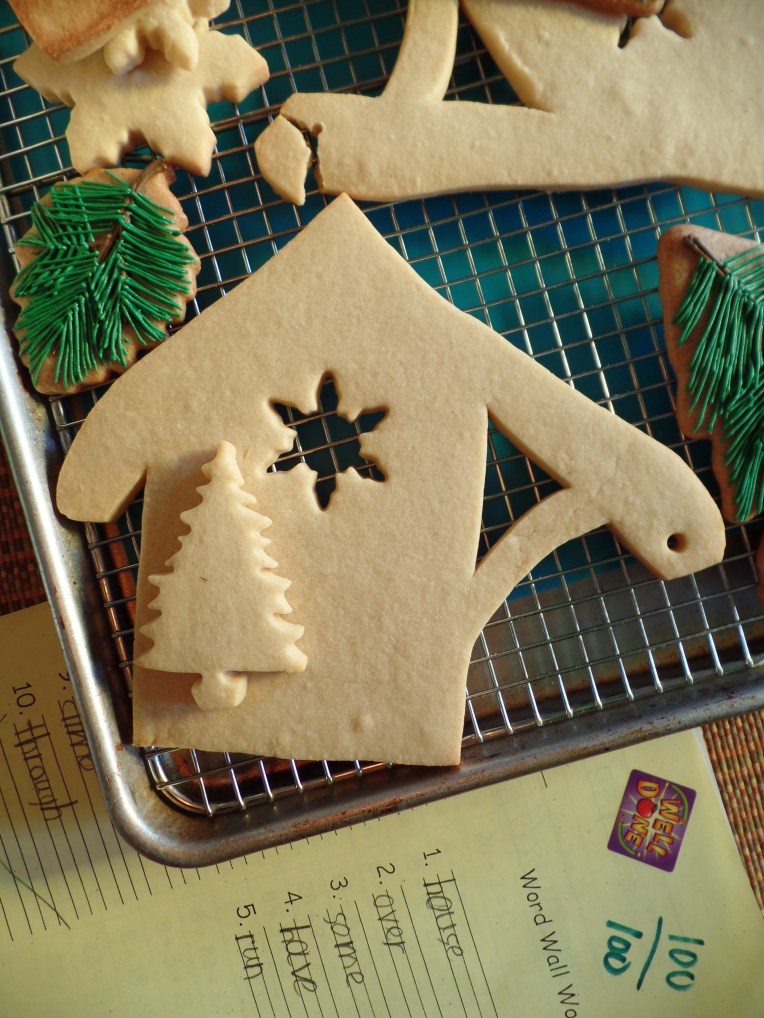
Handcut cookies.
Birds and bases.
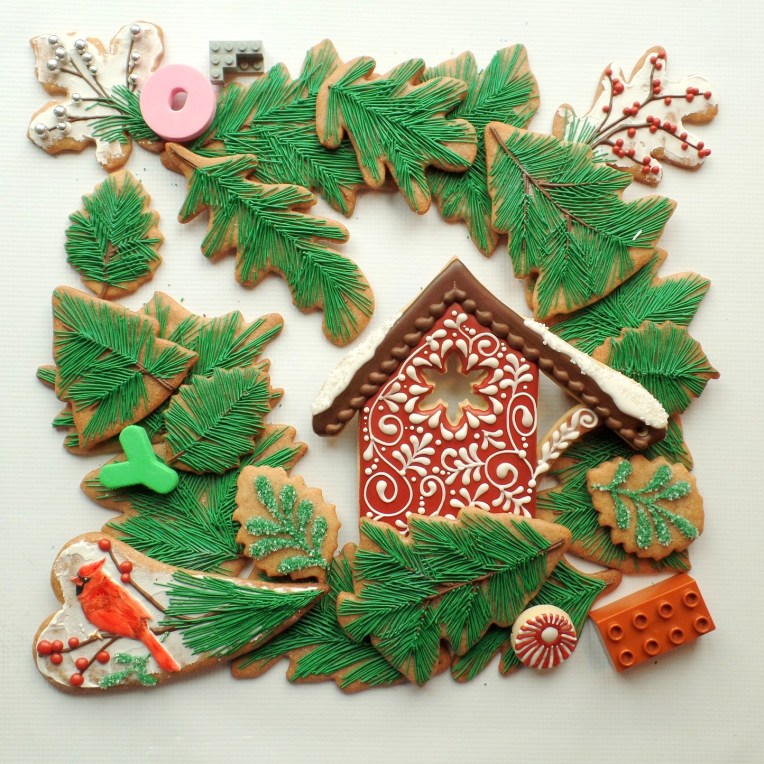
Greenery additions and other elements.
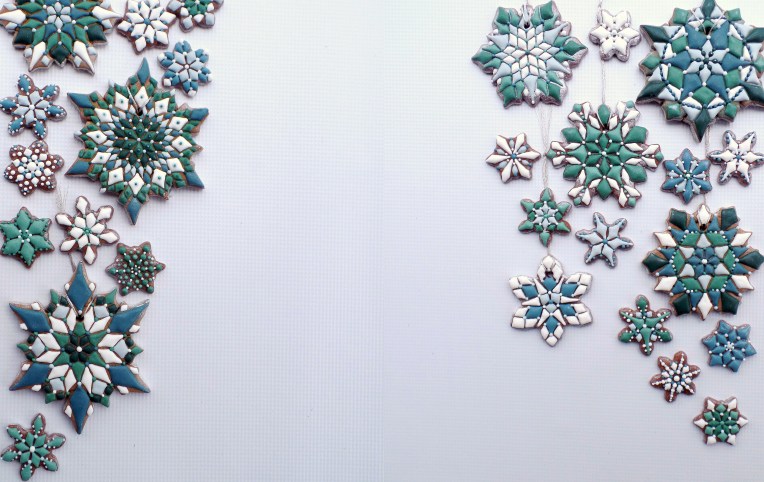
Snowflakes.
Maybe this birdhouse needs a Christmas tree.
Originally designed with a “cloth” hanger that was three dimensional.
Stamped Birdhouse.
Bases Ready. Then I had two days to ice all these cookies and no sleep or pictures happened.
Tada! Only I hated the cloth hanger, and my mom and I ate it.
Set up for photoshoot. I send these to Springbok as well to assist them in their layout.
Second Layer installed.
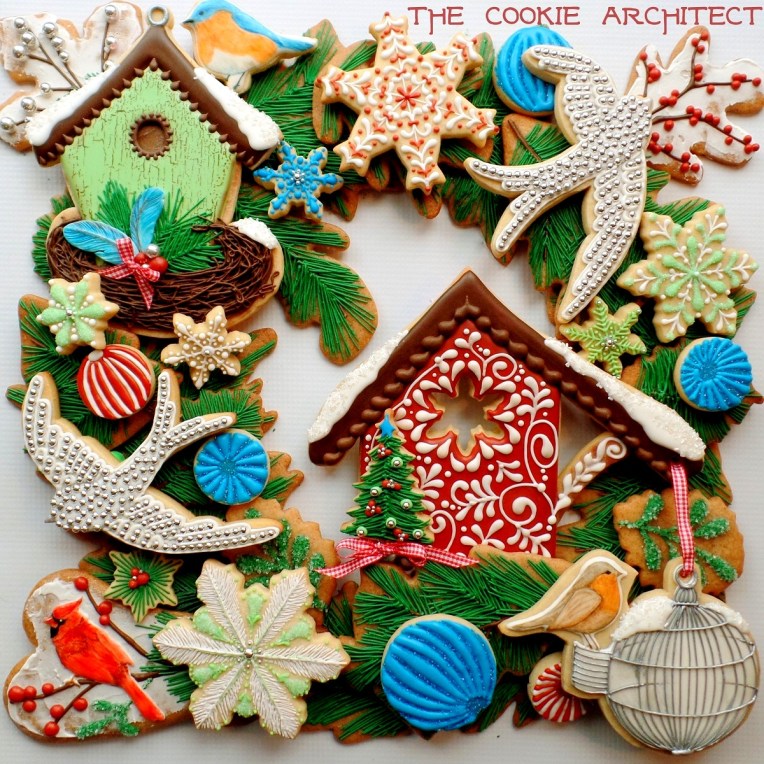
The Full set. This is my picture.
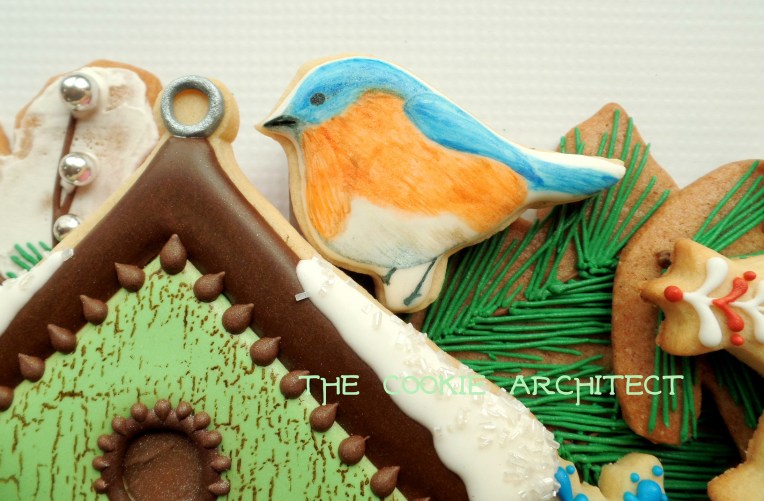
Details of the birdhouse with nest.
Detail of the cardinal.
Little wren. (I think, I am not a bird expert haha!)
Maybe this is the wren? Loved this birdhouse ornament.
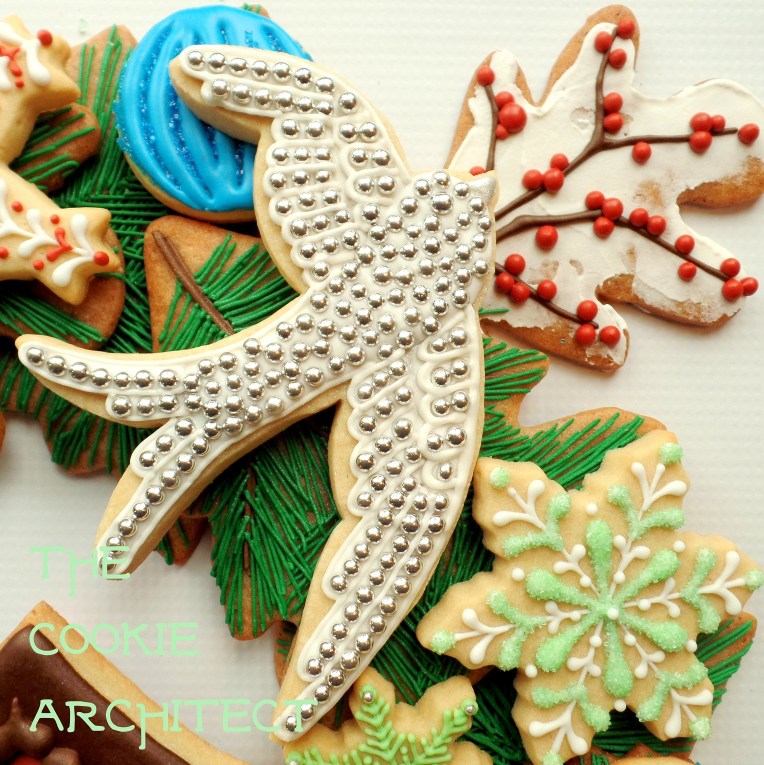
Swooping glittery bird ornamant cookies.
The Crhistmas Creations Puzzle image as published for the puzzle.
They send me samples!!
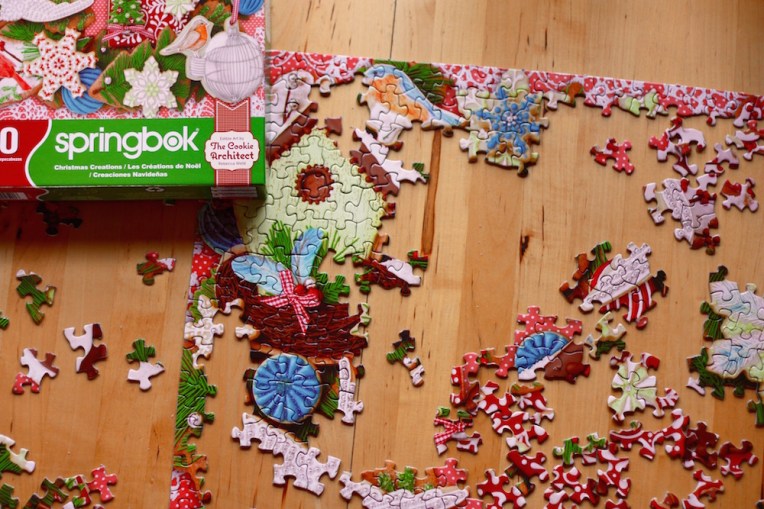
Puzzle in progress. Photo from my favorite blogger Catherine Newman.
From Ben and Birdie blog. This is Birdie doing the bird puzzle. Best pic ever by Catherine Newman.
Note: these last two photos are from my favorite blogger of all time (yes, including myself!), Catherine Newman of Ben and Birdy. They love puzzles, and I love them, so I sent them my puzzles. They are even going to tackle my enormous Spring Flowers puzzle! I am kinda starstuck!
I know, I know, Christmas is in three weeks. I am excited about it too! But before we dive in to the red and green stuff too much, I have some collaboration projects to share with you that have been in the works since Cookie Con, back in September!
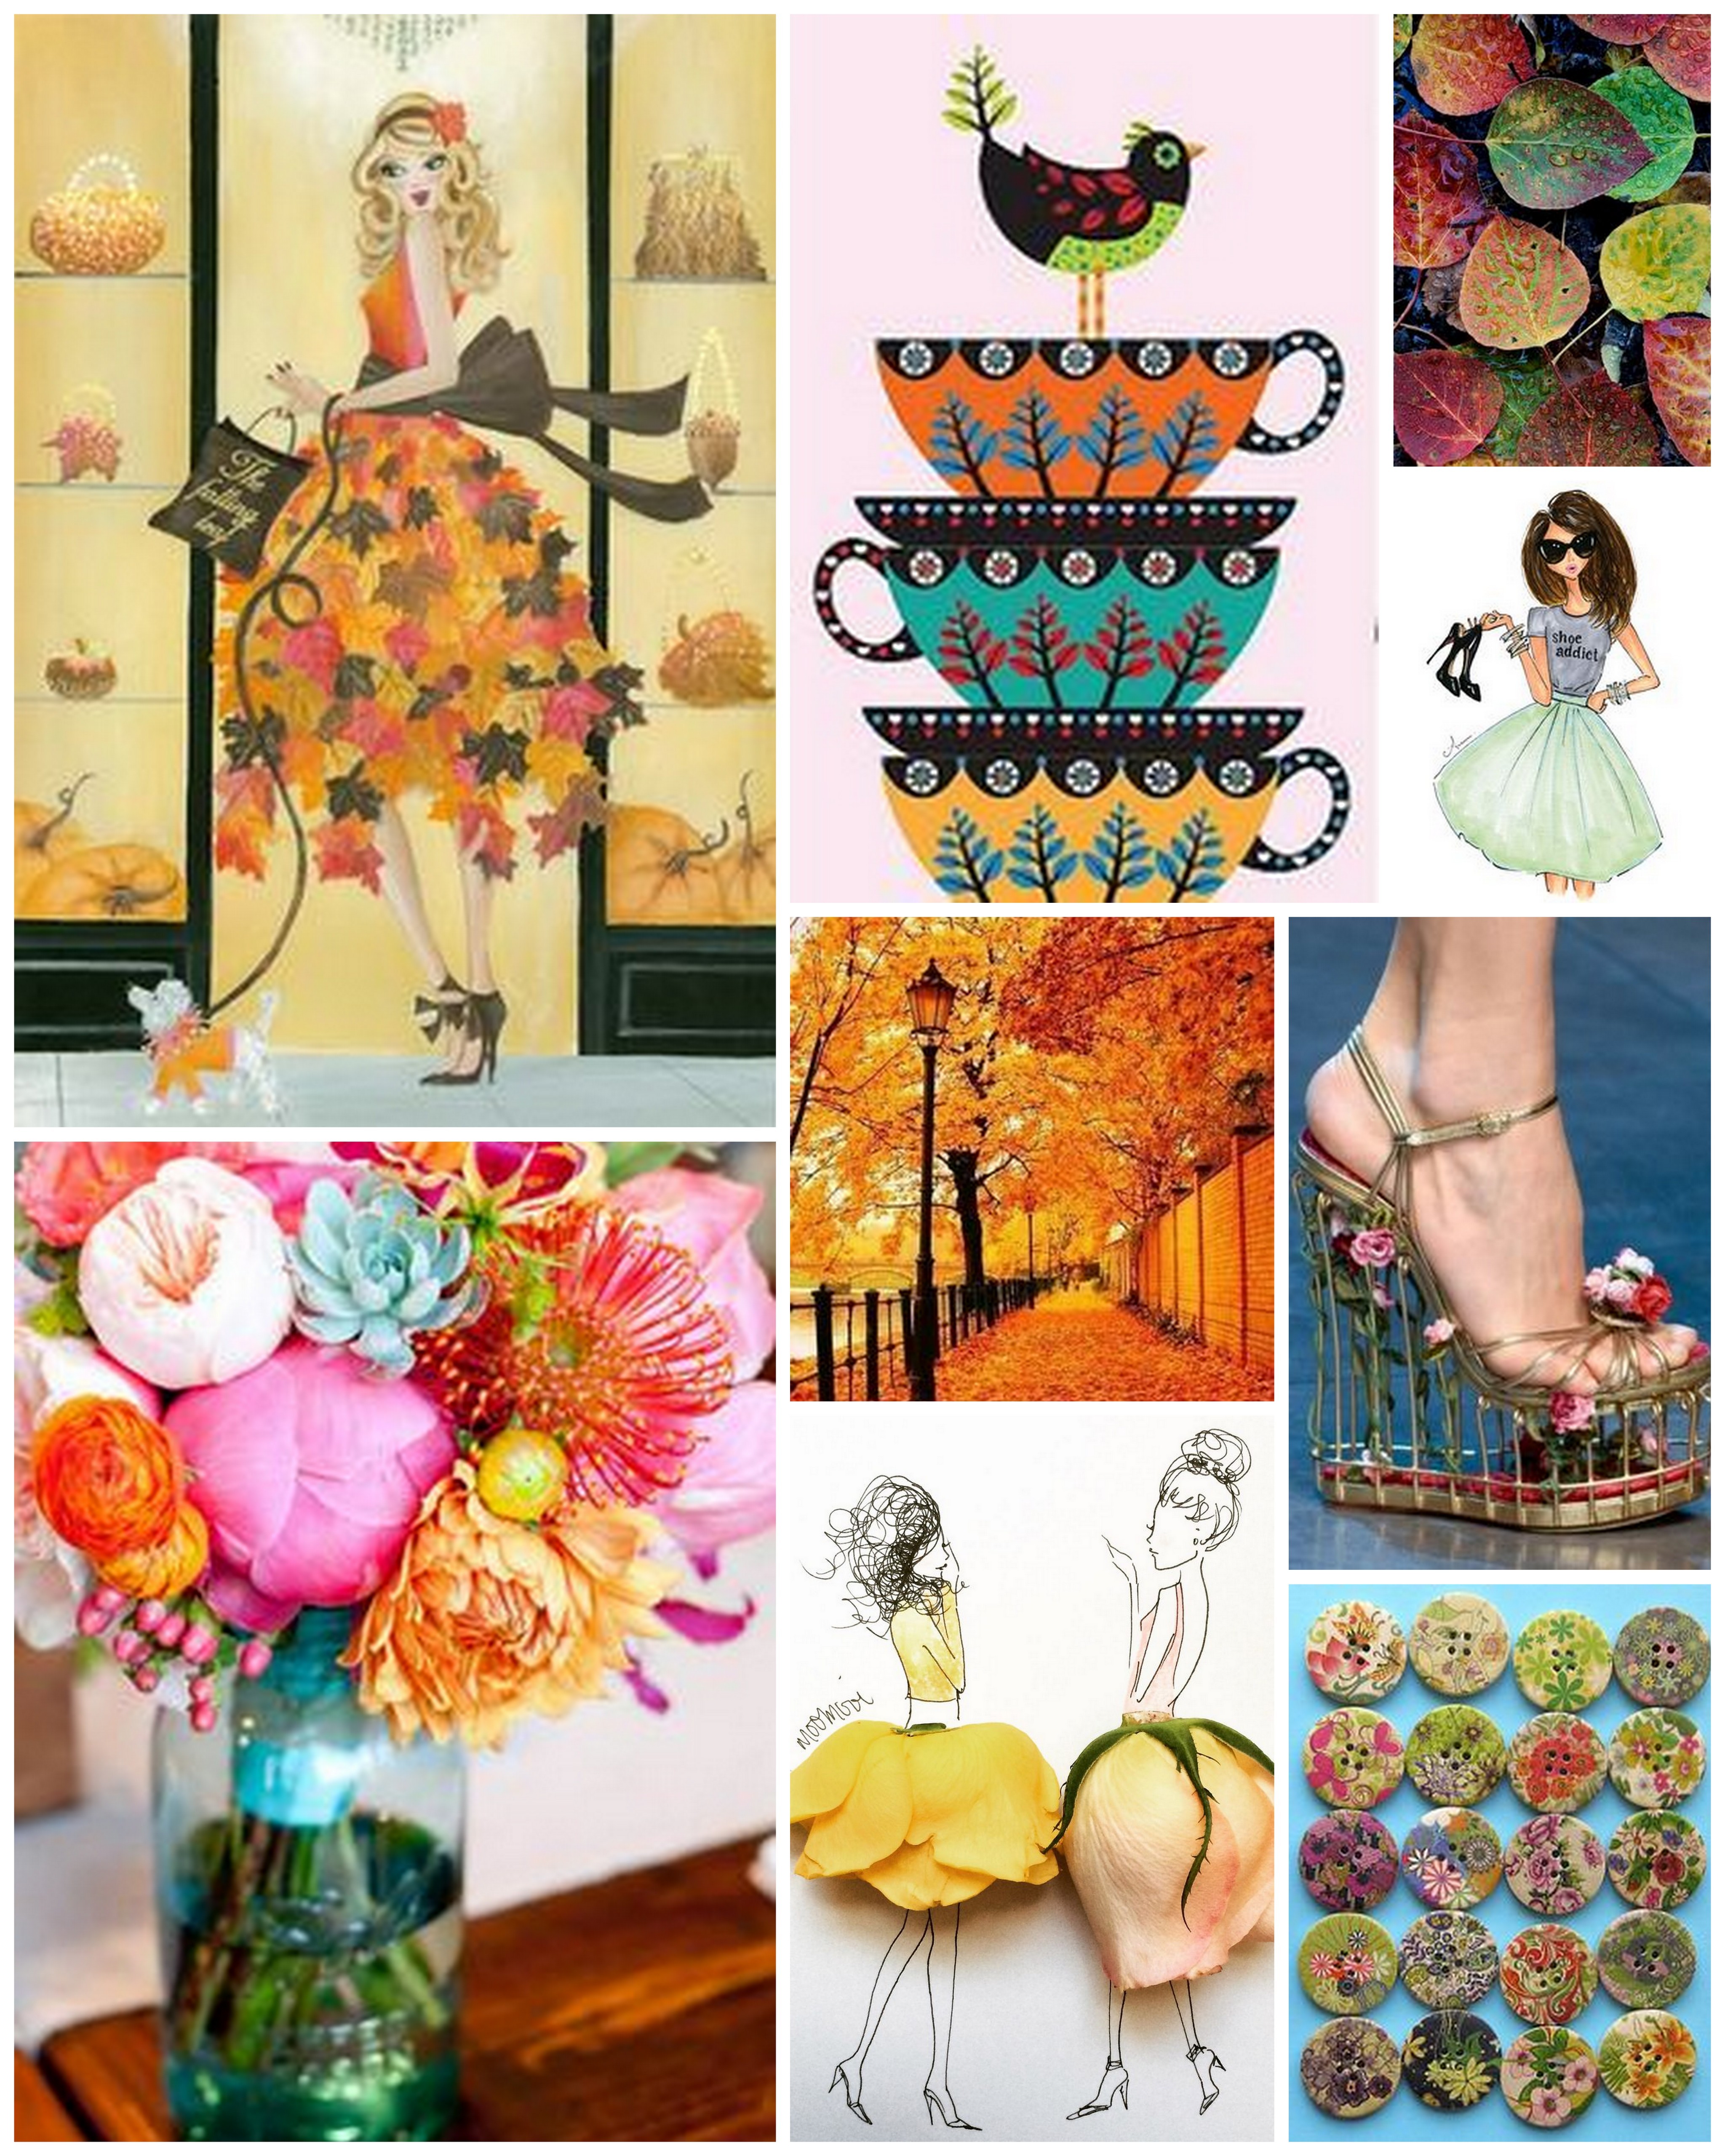
At Cookie Con, Team Cookie (That’s me with the incomparable Kari of Yankee Girl Yummies and Melissa of Melissa Joy Fanciful Cookies) taught a couple of design classes. In those classes, we started out sharing some basics of design and inspiration, and then each of us shared our design and cookie process, to show how you can start from an inspiration and make it your own, and go your own way with it. THEN, we asked the class participants to come up with a theme from an inspiration board, and from there brainstorm how to design a set from that. Each class had been part of a their own group Pinterest board before Cookie Con, and had all pitched in to pin ideas that appealed to them, so that we had a board to look at in the class. Both boards were a cool reflection of their participants, so each had a different vibe. Here is a sampling of the board from our first class:
The board had lots of ladies in cute skirts, lots of nature, tons of flowers, shoes and fashion shots. We wanted to come up with a theme that might actually happen, one where bringing decorated cookies would be just the perfect thing. With all the images we were looking at, we came up with a very fancy tea party, like if the women from Sex and the City decided to throw a tea party at the Four Seasons. Our Cosmopolitan Tea Party Set, as we designed it in our class, included fashionable ladies for every seasons, tea cups with natural elements, shoes with flowers and plants (or even made of plants). We explored how we might pick cutters for those cookies, and different ways to organize a set, from a big platter to personalized name card cookies. I hope the participants in class had as much fun as Team Cookie did, because we had a blast!
After the class, we offered them the challenge of taking our starting place, the theme and the inspiration of the Cosmopolitan Tea Party and going through the process on their own to come up with some actual cookies! In the end, it was too much for many busy cookiers to take on at this time of year, but we did have one game participant, Beth of Love Bug Cakes and Cookies! We loved the overall set, it’s so great!!! Some of our favorite details are how she used a uniform cookie for the ladies, but mixed it up with the composition so that they are all very dynamic. Also, great use of design to solve the age old “face” problem. Don’t want to worry about the face? Just choose a different angle! The colors hold together well, but you can still pick out the four seasons. And, she also managed to use the plaque cutter that we gave out in class- which was generously donated by Truly Mad Plastics. Thank you Beth for contributing!
Some of Beth’s classmate’s have said they will participate in the New Year when they have more time, so if that is the case, you can look forward to me sharing those with you too when they are ready!
In the meantime, each of us on Team Cookie also did our take on the theme. Similar to the examples we used in the class, you will see how three different designers can take their needs, style, and skill and do three very different sets of cookies!
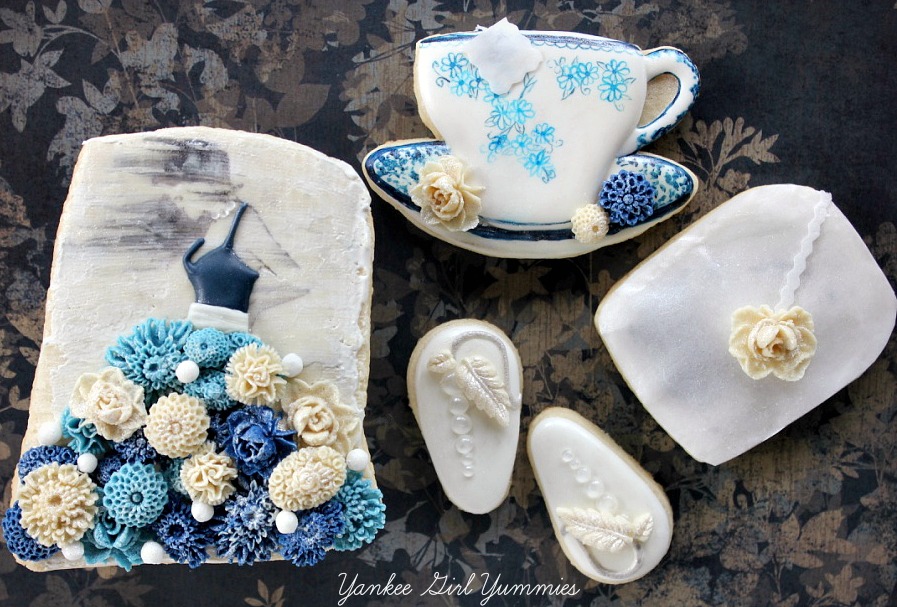
Let me first show you Kari of Yankee Girl Yummies‘ set. I have been dying to share this with you guys since I first say it. It took my breath away. It’s a smaller vignette than Beth’s but how evocative of nature, of elegance and sophistication. I, for one, am smitten! That lady in the wind is so gorgeous!!! And on a lighter note, that tea bag, I have it on good authority, is wafer paper filled with chocolate jimmies. Perfect for your cookies and ice cream treat. 😉
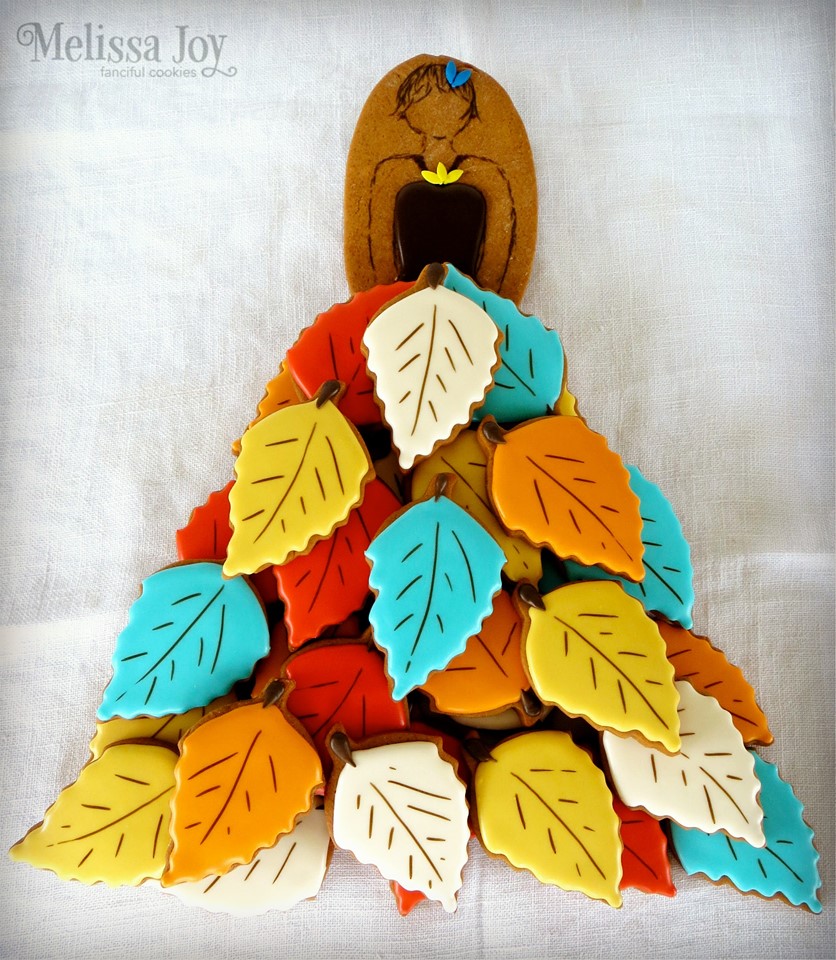
Melissa of Melissa Joy Fanciful Cookies did a set that is perfect for getting glamour and simplicity together at the same party! Which is her specialty, right? A platter inspired by some of the nature/fashion images from the Pinterest board, and perfect for that Fall tea party, or book club, or fashion show! What a sweet girl, and the colors and shapes for the leaf skirt are perfection. One of the fun things about the class was showing that it doesn’t always have to be fancy or handpainted to be a gorgeous and clever design!
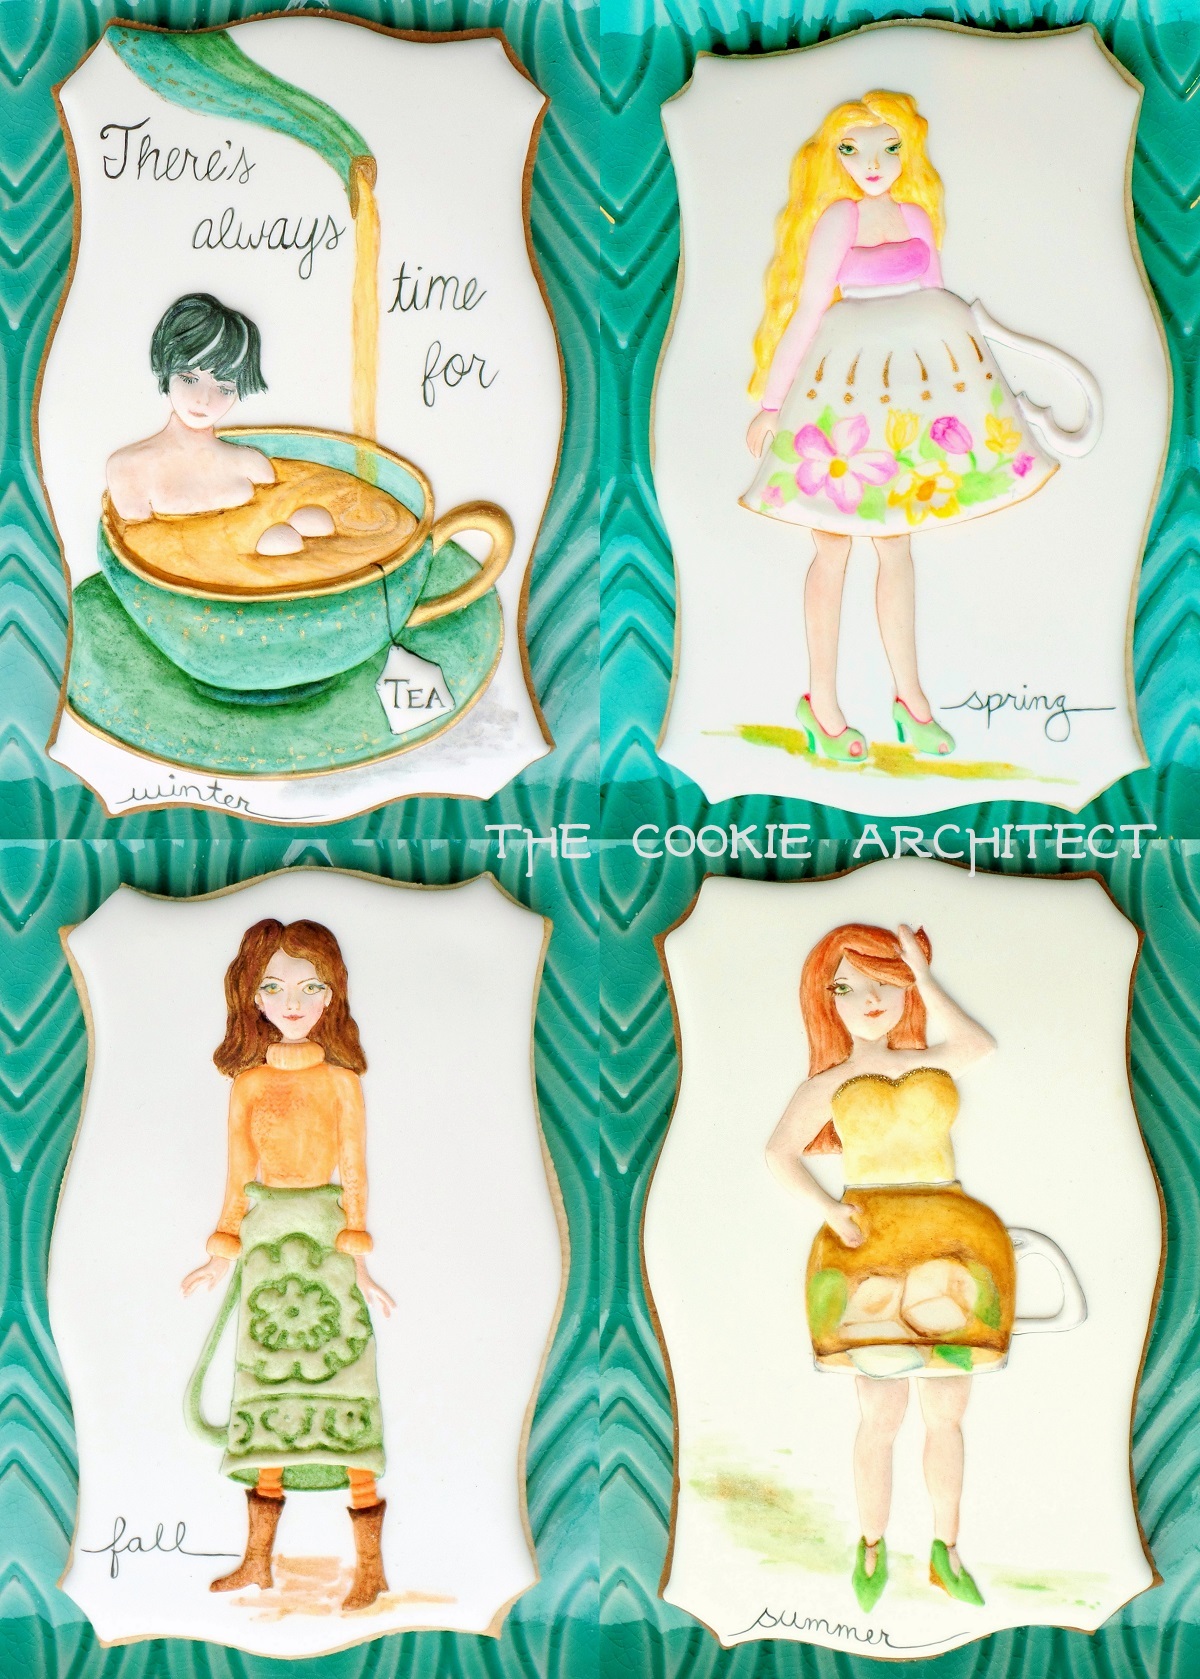
Last but hopefully not least, here is the set of cookies I was inspired to make! I saw a cute little drawing of a girl with a teacup skirt and thought that would be a fun way to do a tea party set for fashionable ladies, and it would be fun to think about what makes tea so great year round. I was also inspired by fashion sketches, wanting to keep the backgrounds very clean and bright. And in keeping with my body positive politics, I decided that I would change up the body shapes of the woman so they weren’t all stick thin. Beauty comes in many shapes and sizes! If you want to see more pictures of these cookies including individual shots, be sure to check out the gallery in my portfolio!
Thank you to everyone who took our class at Cookie Con- we had an absolute blast! And thank you for all who participated in our mini collaborations, Beth, and hopefully in time a few others! And stay tuned too for the other class’s project. It is completely different. Just goes to show you how much fun you can have with creative cookies!
So, I have a couple of local cookie friends, which is awesome, because I can talk cookie on a regular basis with friends near and far. This morning I ran in to one such friend and ended up giving her an impromptu five minute lecture on cookie pictures and computers, and I thought I would share the highlights with you too, in case it is helpful to someone!
First of all, I have had several projects lately either for publication or for use on the web that have had me brush up on my pixel and dpi knowledge. Here’s the highlight. For any picture posted on the computer or a website, all you need to know is its pixel size. So for example, if you are interested in doing the interesting challenge this month on Cookie Connection, you will need to size your submissions to a certain size. In the example of that submission, the thing to know is that you need one photo 1900 x 1200 pixels, and another banner pic that is at minimum 690 x 127 pixels. First of all, what this means is that this is the proportion of these images. The first is a rectangle a bit wider than it is tall. And the second is very wide and not very tall. One thing to note is that sometimes, only the proportion is what matters- ie, if the banner photo is 1380 pixels wide and 254 pixels tall, that will probably work great, maybe even better, as that other size will be kind of a small picture. BUT a 20700 x 3810 pixel image would not be better, because that is an enormous picture that would look blurry when shrunk down to the the computer screen size (because programs and video cards have a limit to what they want to show you), and will tax the computer that has to do the shrinking. Similarly, something the same proportion but smaller is no good either, it will look out of focus as the computer scrambles to interpolate some pixels to fill in the gaps as it stretches the image. (Sorry for the computer anthropomorphic-ization!)
A quick note here that I have discovered that a too big image is no good for social media. Most platforms make public their ideal pixel ratios (Google is your friend), and I try and keep that in mind. The image wants to be big enough to look good on a computer screen, but small enough that it won’t need to be scrunched too much to fit on a phone. If it is poster size, the social media platform will downsize that image for you, and it will blurry!
When I take pictures I usually have the camera set to take the biggest picture it is capable of, as downsizing an image is way better than upsizing it. Even with that, there is an overall limit to what I will be capable of doing with my camera- there are no billboard photos in my future. In the case of the Cookie Connection challenge photos, I will be organizing the shot with the right proportions implied by the pixels. Then, as always, I will experiment with how close or far away to take my picture. Depending on lighting conditions and your camera settings, sometimes for bigger layouts, I need to back up a bit to let in more light, and to be at the best focal distance for the camera. It has a “macro” setting that lets me get in close and get good focus, but that works better for one or two cookies. It doesn’t tend to work as well when I need to get in a big array, so I usually have it set to regular interior shots, and I just take some test shots to see what distance works best. EDITED TO ADD: When I took the pictures, the cookies were all around the border, with the middle empty because it will be covered in the website. Well, that meant I had a very sharp white middle and a very blurry edge, because that is how the camera focuses unless you are more of a pro then I am! So I ended up taking two pictures and collage-ing them together side by side. I just sized each side to half of the final size when cropping them initially.
Now, when you are taking pictures for print publication, size becomes a much bigger issue. That is where DPI, or dots/pixels per inch, comes in. If you are trying to do a picture that will be printed at a larger size- 8×10 or 8.5×11 inches, you need a good size (in pixels) image. Most publication works well at 300DPI. So for an 8×10 photo, you would need a 2400 x 3000 pixel image or larger. So for every inch of your print, you need the number of pixels of your dpi. (300 pixels time 10″ equals 3000 pixels tall.) In the case of print, bigger is better, but smaller won’t do at all. That’s when things get blurry in print. When I am taking pictures that need to be larger like this, I make sure to minimize the need to crop, and get in as close as I can to the finished shot. That way I am pretty sure I’ll have the pixels I need.
Now, to get my pictures from camera to the right ratio/size, I edit them with two programs. I use the Picasa download on my computer to brighten, crop and add text. Picasa lets you set custom cropping ratios- so I have programmed in already a FB banner, my blog banner and a few other things. For the Cookie Connection submission, you know I will be typing in the right ratios for those pictures!
A BIG WARNING HERE: If you use a web based editing program like picmonkey, they WILL downsize larger images as they import them, which is no biggie for most social media and blog applications, but is no good for other uses. One friend found that when she was importing her very large images they were becoming blurry in the downsizing, so that when she was trying to crop them to the right pixel size, they were sort of stretching them big enough again and then it was just a hot mess. Another friend was putting her pictures in and trying for a large size for print, and then scratching her head when her perfect picture ended up out of focus.
For me, if my photo is destined for social media, I open it with Microsoft Paint and use their re-sizing tool to downsize the image- usually half as big as what is in my camera is a good size for Facebook. But save both! You never know when you might want to use a picture for something else besides your feed.
My mac friends tell me that iPhoto on the Mac is very similar to Picasa, and that when you export your photos from there you can choose a size- Full size, large, medium and small, which lets you do something similar to what I use paint for. If it were me, I’d probably be using medium on FB, and full size for my prints. Some Mac programs even have settings like “Ipad” that optimize for social media. But these are just rumors I’m hearing in PC land. 😉
So…it’s kind of a complicated issue, and I played a little fast and loose with some of the technicalities to try and make it clear. Is this helpful to anyone? I hope so!!! Questions? Let me know!
It has been too long everyone. Blogging is hard.And I have been busy! Because did you guys know there really is such a thing as Cookie Con? Yep. It’s real, it happened, and it was a blast. Our Team Cookie classes were a huge success, and will be blogged about I promise- I have a whole list of posts to do. The Classes, the Con, assorted cookies, all sorts of things. Today’s is about my Sugar Show entry from Cookie Con 2015!
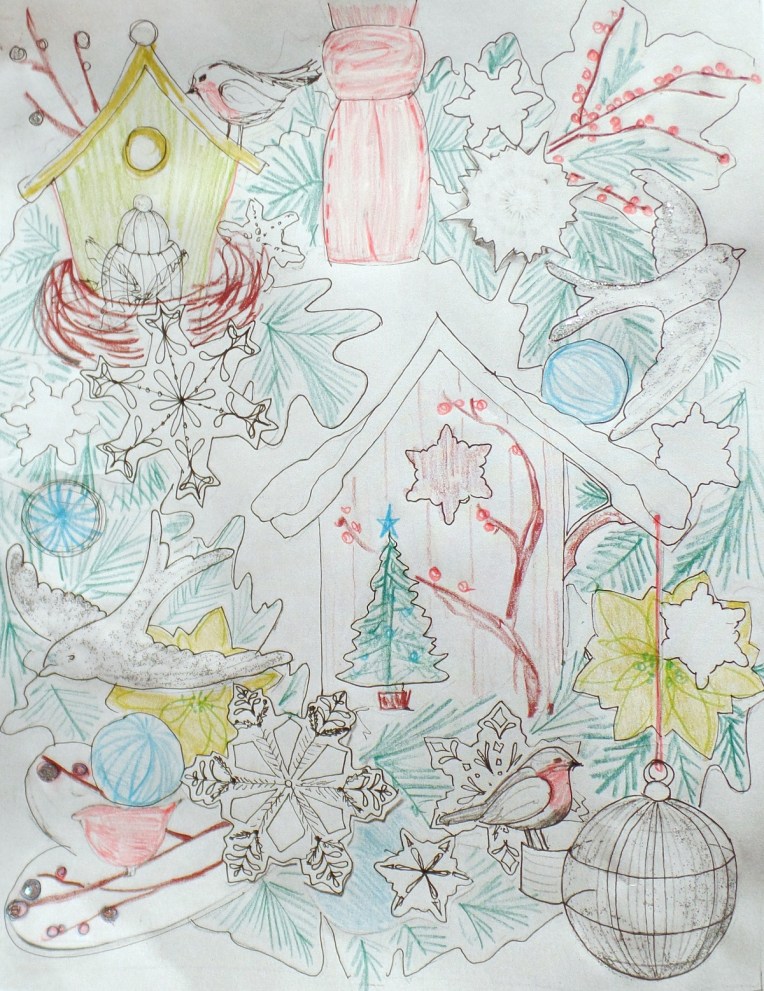
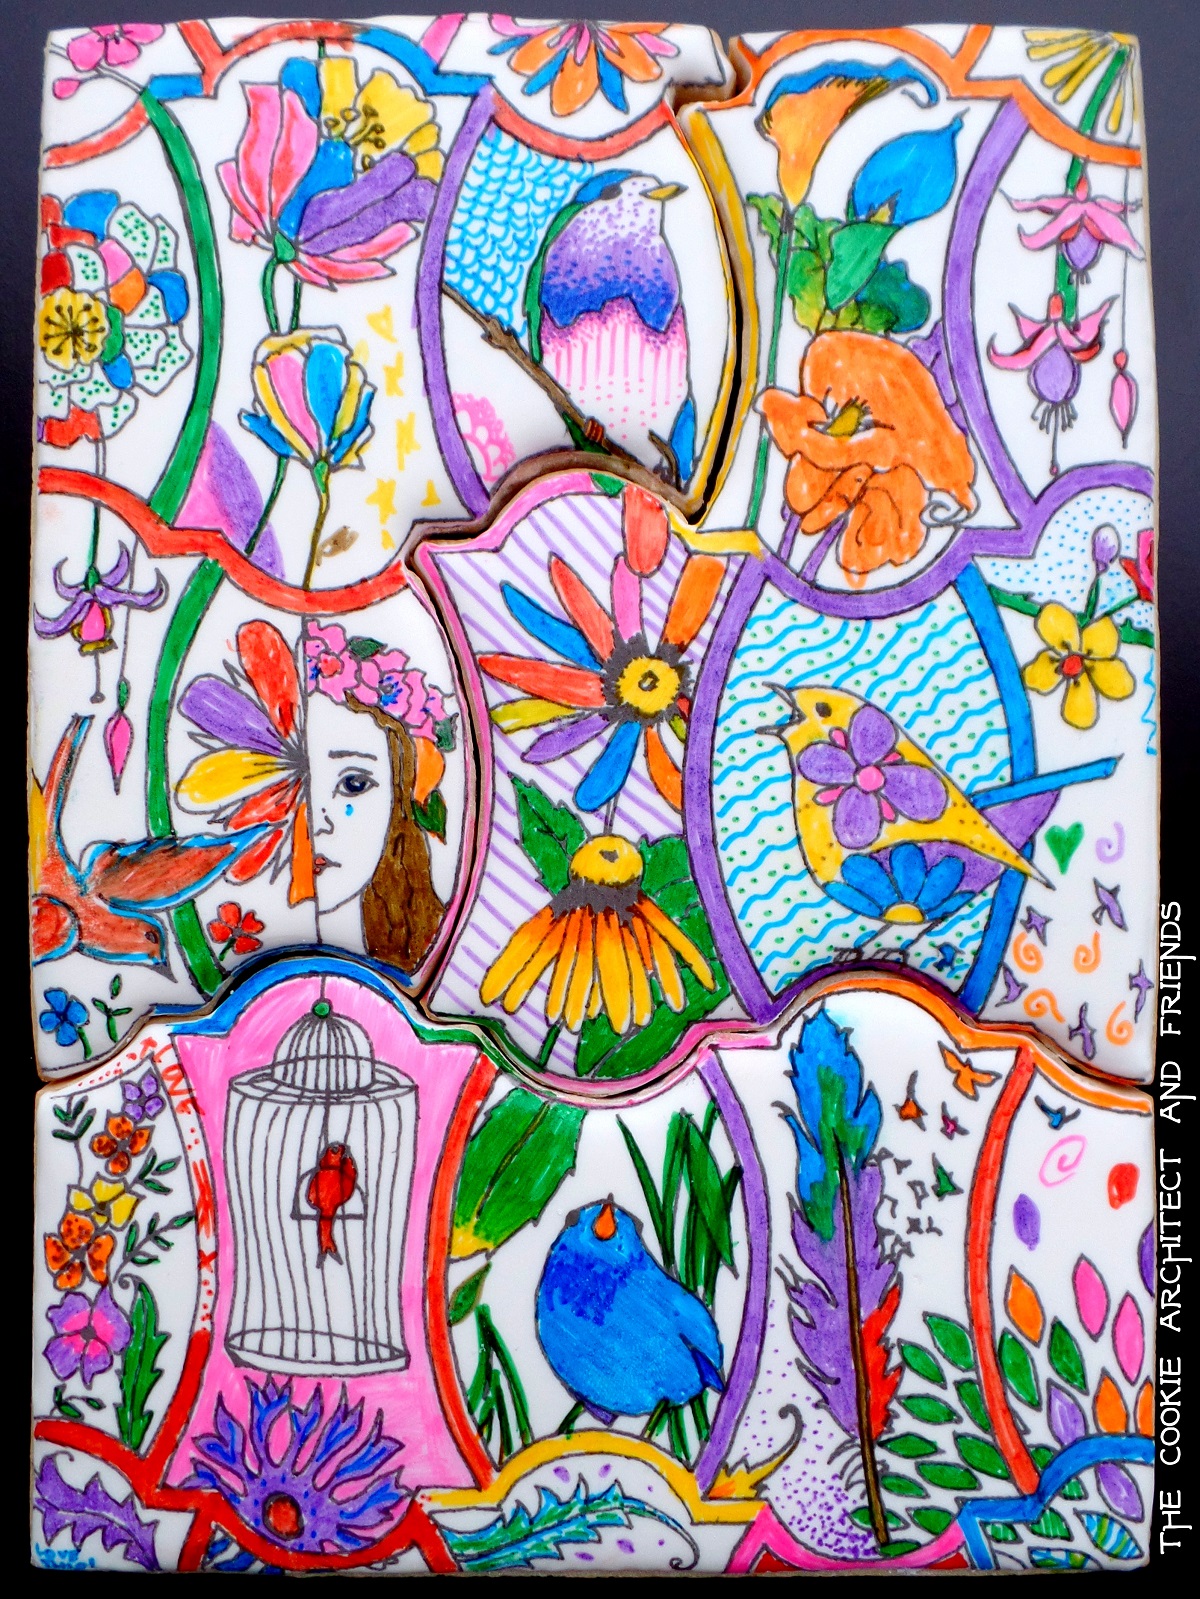
Last Cookie Con, I tried to do something in a new style, with my first set of painted Matryoshka dolls. This time, I aimed for something a little more “me.” And what is more me than a coloring page these days? How about a cookie collaboration!! I decided to go something interactive, that I thought would be fun. I designed and drew a coloring page on to a cookie, and then for the Sugar Show at Cookie Con, I put it out with a set of edible food coloring markers, and a little note asking everyone to participate by coloring some of it. And everyone did! What a blast!
Here was the entry as I submitted it to the show. The drawing was an original composition that I drew. I have been grooving on birds, so I decided to do a birds and flowers thing, and a little flower girl snuck in there too. I wanted the pattern I used to be cookie cutter related. Do you guys recognize the cutter shape I used? It’s the Georganne Cutter designed by Lilaloa and sold at Whisked Away Cutters. I’m going to have to see if I can get the complimentary Georganne’s Accomplice cutter made to so I can make a cookie tile pattern!
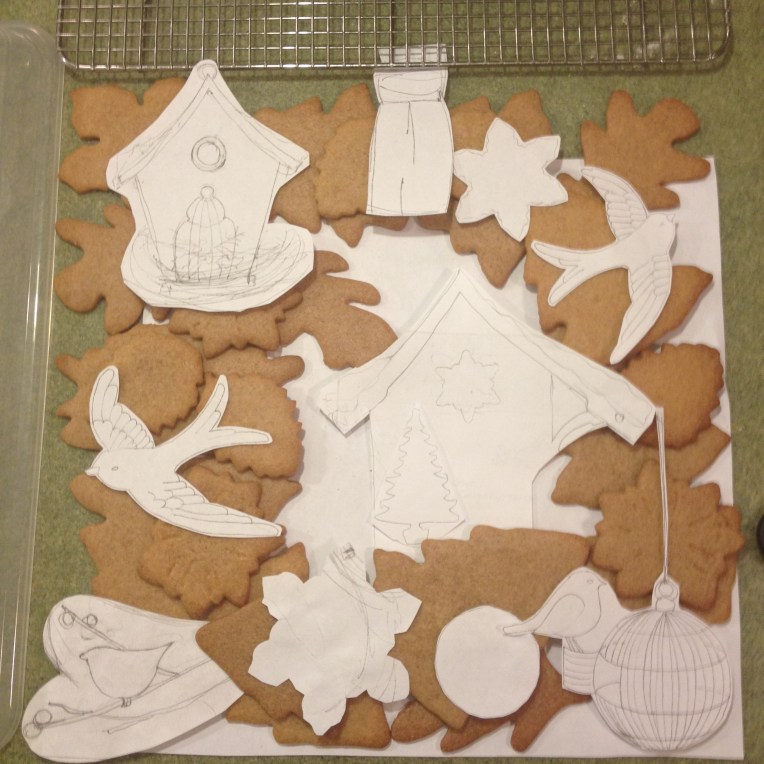
I did a lot of experimenting to figure out a way to do the line work like I wanted but not have it bleed when the cookie was colored over with marker. I knew that it was probably too ornate of a design for wet on wet, and my early experiments there were a failure anyway. In the end, it turned out that if I used my Rainbow Dust food marker and let it dry, then dusted with cornstarch, and the lines didn’t blur when I scribbled on top of them. Perfect, and easy!
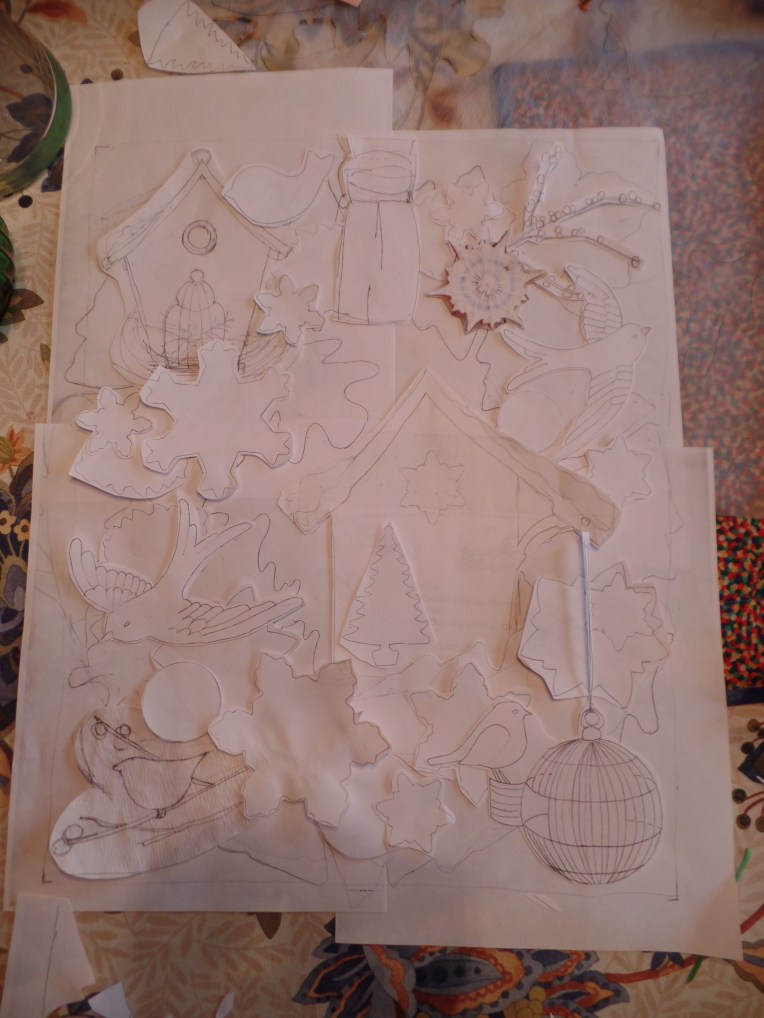
Originally, I had intended for the cookie to be all one piece, but then I decided that it would be harder to transport that way. And in a classic Cookie Architect move, I found myself making a bizarre set of curved puzzle pieces that had to all fit together, and were NOT easier to transport to Salt Lake City. I’m silly. But they did fit together, and they did get to Cookie Con in one piece, so all’s well that ends well.
Watching my plan come together during the convention was definitely the best part! I even made a quick video showing the page getting colored in!
And in the end, it was amazing! And at least 61 people, including a record two (2!!!) MEN helped to color it and make a piece that captured the cookie community spirit that is Cookie Con.
Contributors Included: Bette Wu, John Adams, Rosemarie Carroll, Nikki Krause, Lisa Provenza-Bebar, Robyn Wilson, Andrea Jensen, Lindsey DiLoreto, Lisa Lamb, Lara Parodi, Bobbi Barton, Andrea Young, Melissa Mitchell, Laura Dong, Karine Lemonnier, Kelly Carter, Delorse Sword, Nancy Cavagnaro, Signa Atherton, Susanne Kristine, Janis Nunez, Barbara Newlon, Summer Turner, Jennifer Wallace, Becky Kasten, Josi Dyer, Nicole Hastings, Kimberly Dickerson, Malinda Hollinshead, Sally Koldenhof, Sandy Parkhouse, Sherree Hellinger, Desiree Sedwick, Sandee Moss, Peka Peke, Kathy Pilato, Melissa Murray, Kimberly Damon, Kari Arroyo,Toni Shavers, Josie Felix, Stephanie Organes, Tatiana Khromushina, Lilly Fenton, Ameeta Rajagopal, Cindy Timpone, Karen Summers, Mike Summers, Kendra Player, Claudia Ayala-Frush, Sarah Kluge, Silvia Latour, Brenda Byrne, Belinda Bain, Heather Impson, Katy Metoyer, Dany Lind, Sarah Kersten, Christine Donnelly, Rebecca Weld, and I’m sure others- let me know if you aren’t on the list but helped on the cookie coloring!
So here is the GIVEAWAY part! I am giving away this actual coloring page cookie. And since at this point it is a display piece, I’ll also include a few eating cookies so you can get a taste for some fresh Cookie Architect deliciousness! For a chance to win, all you have to do is comment on this blog post (if the comments option isn’t showing, click on the title to “enter” the blog post instead of the page stream). In the comments, I’d be curious to know which of the styles I’ve worked in is your favorite(or which of my cookie sets), and/or what you’d like to see me work on next! Giveaway will end Tuesday at 8:00pm EST. US and Canadian mailing addresses only- others can win for a friend! (Congratulations to the winner- Trisha M.!!)
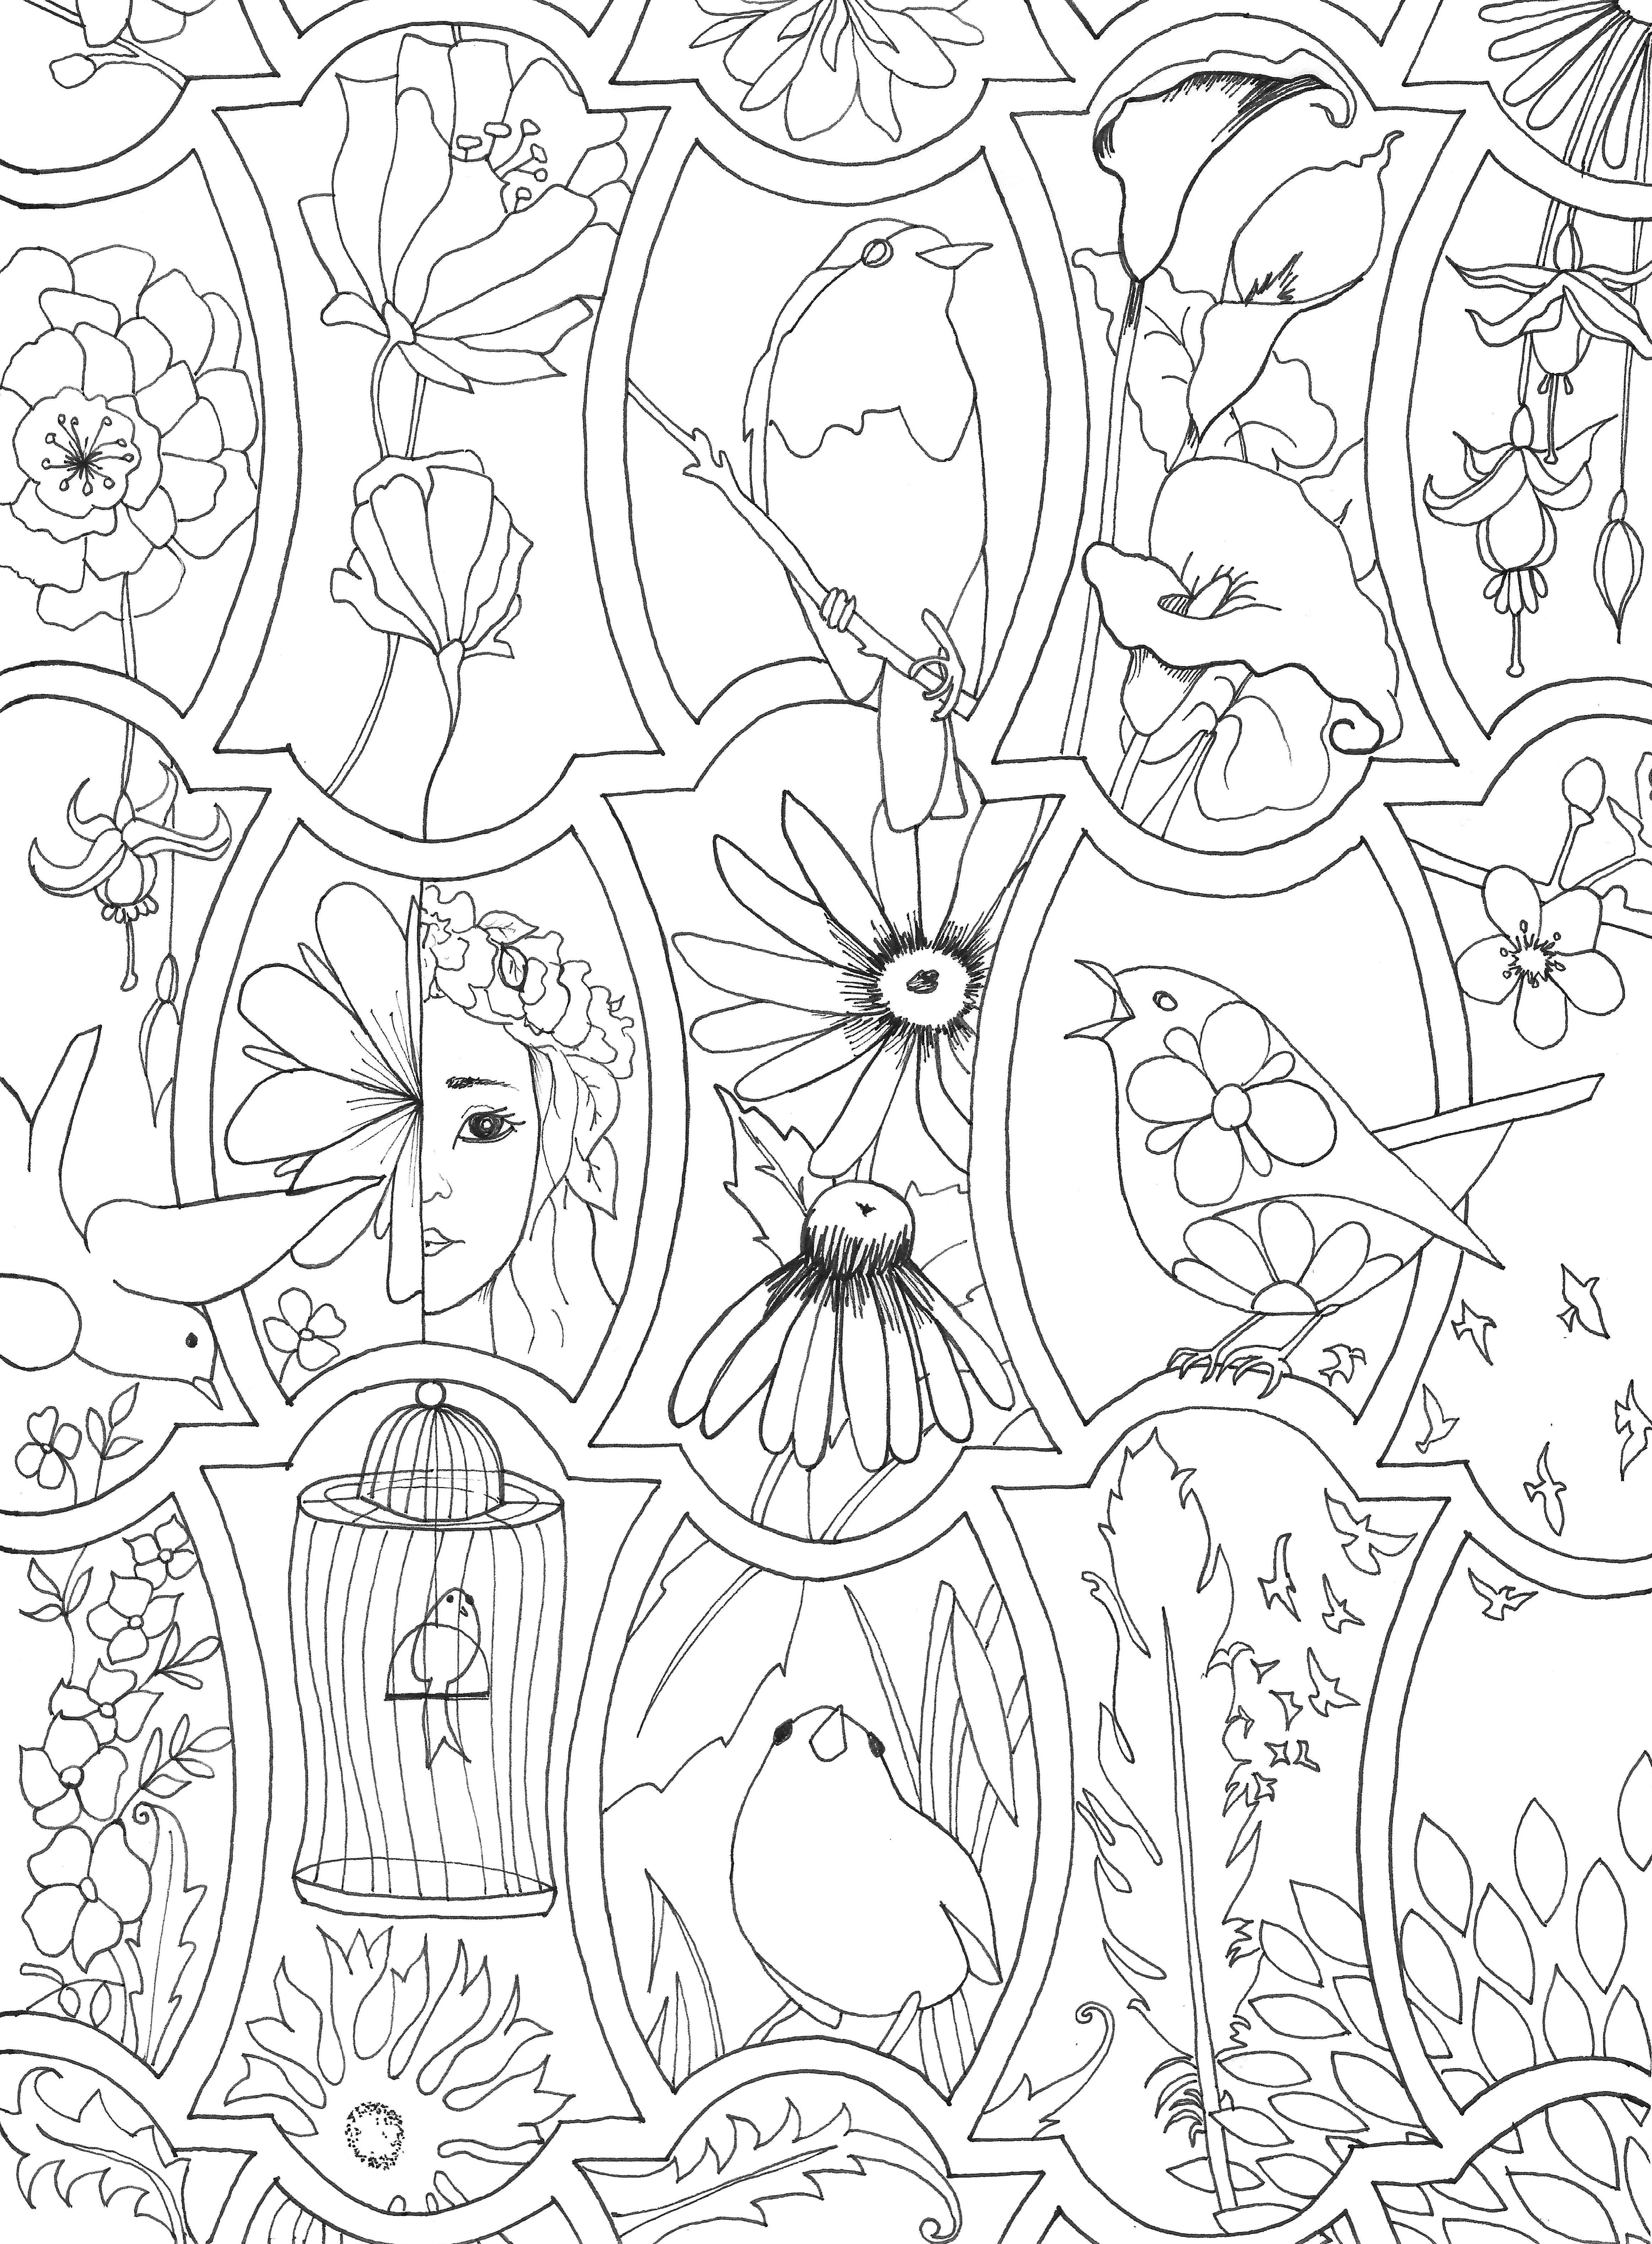
And last but not least- I promised you a treat, and that treat is that I went ahead and made my coloring page cookie design into a real printable coloring page! You can download it by clicking here. If you color it, please share! I’d love to see it!! And be sure to check out my other coloring pages here on the blog!
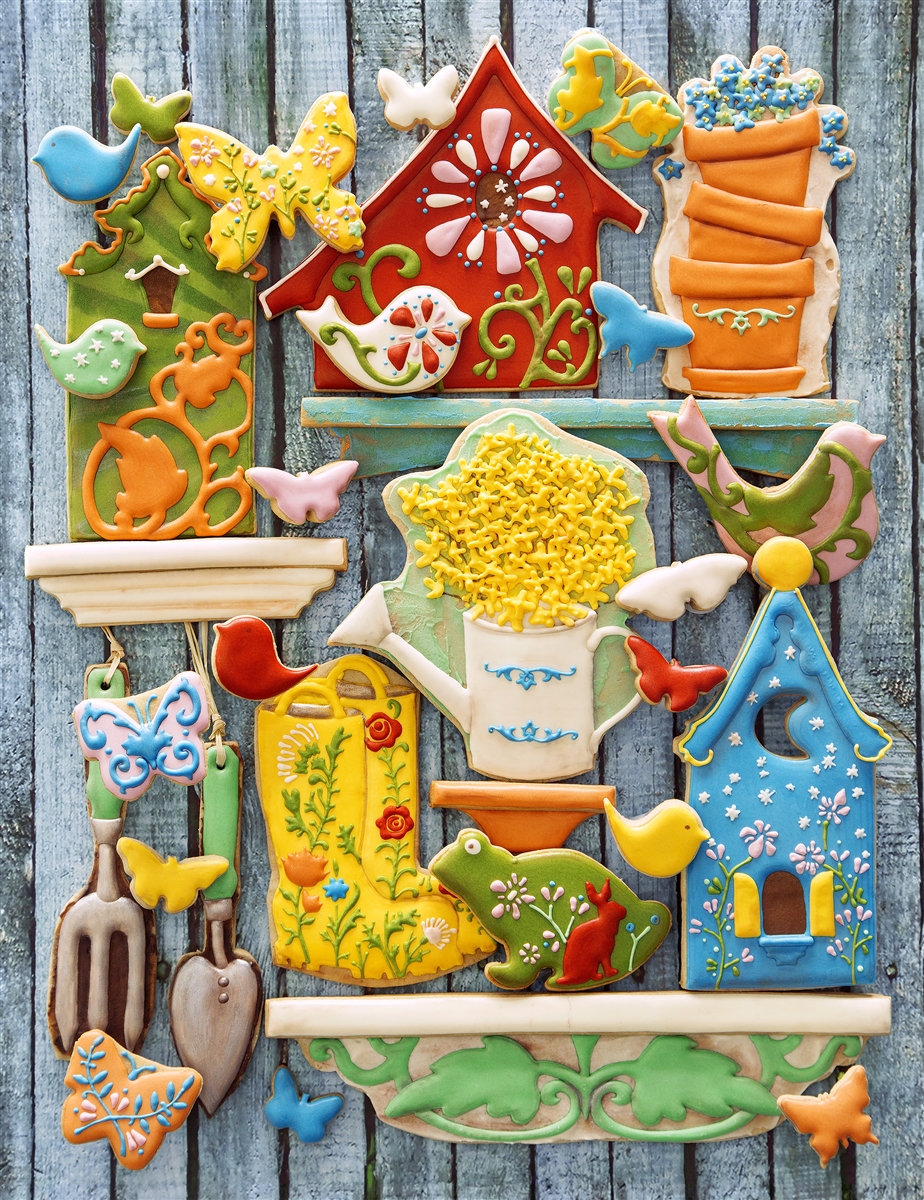
Hi Guys! I know I am very behind in sharing my stuff with you guys, but Summer has been as crazy as Spring was! But I just HAD to stop in to share with you my excitement for today, the day that my new Jigsaw puzzle is released over at Springbok Puzzles. It’s a Christmas/winter themed puzzle with lots of cookie birds and birdhouses on a cookie wreath. They are calling it Christmas Creations. It’s 500 easy pieces, and a great price point. I’ll share all the details and all the photos that I have in another post- gotta get back to work! Thanks friends for sticking with me. 🙂
Hi Everyone! I’ve been so busy and I am behind posting blog posts about my cookie projects, but if you check out my online gallery you will find that I’ve been keeping that up to date at least!
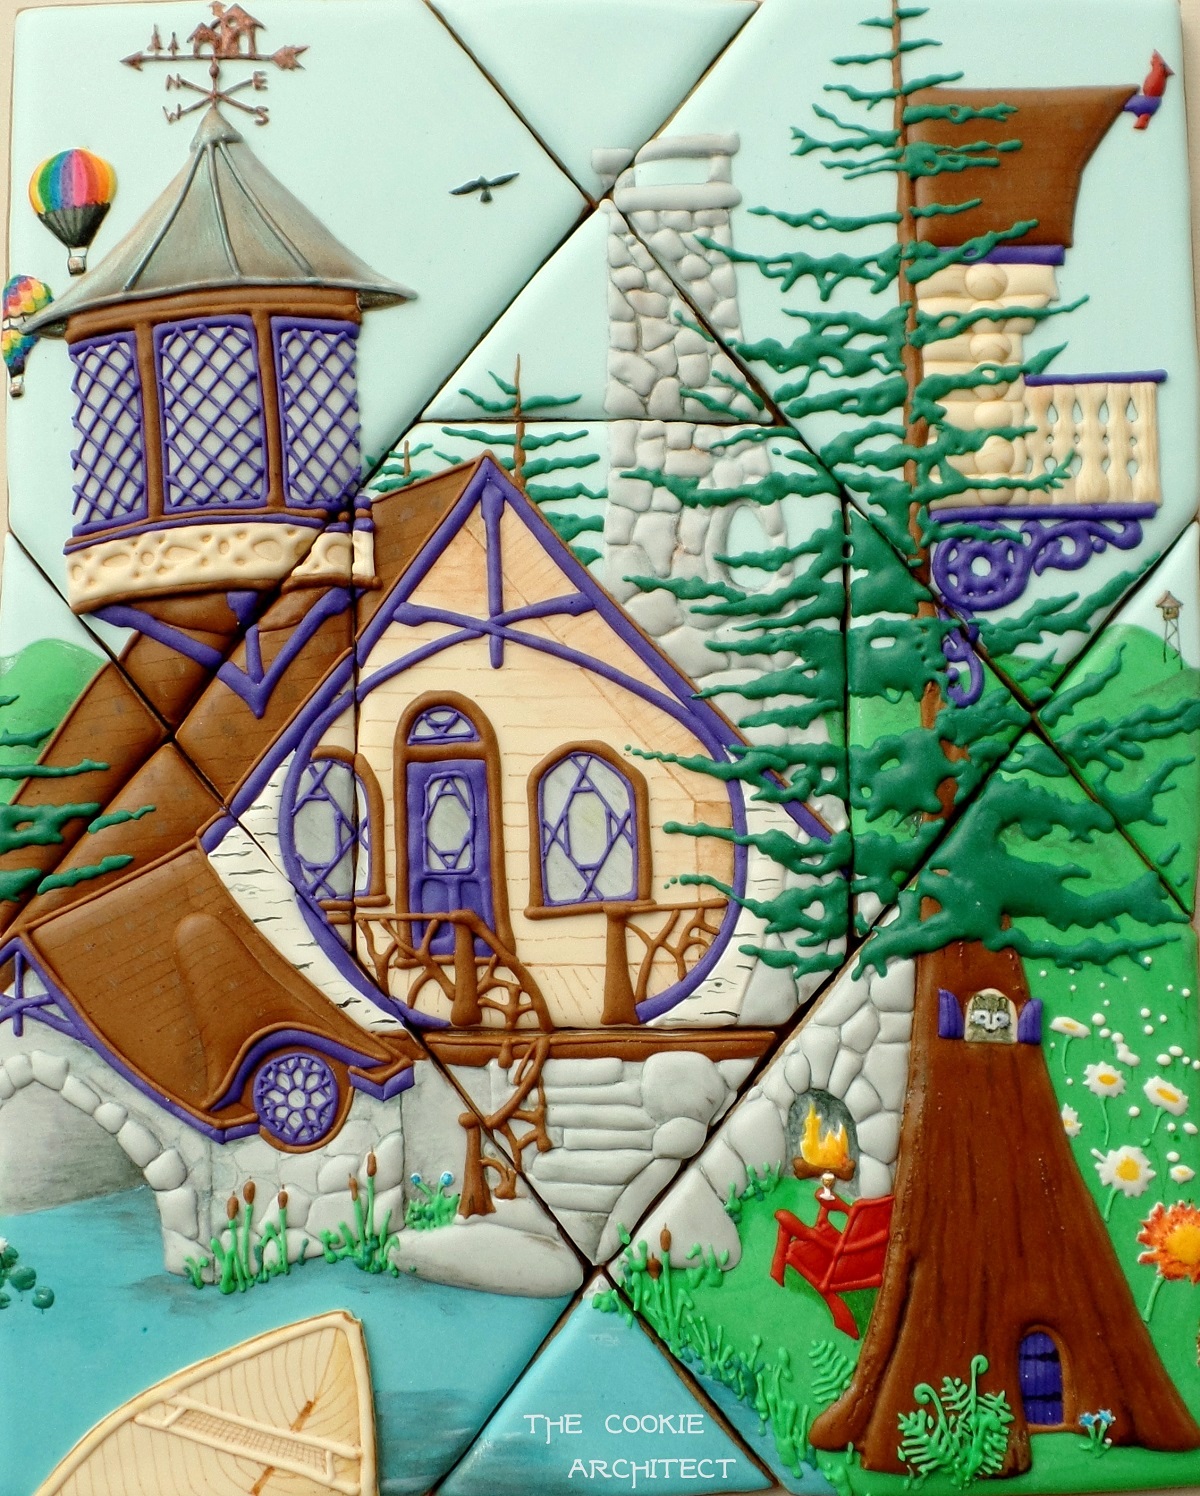
Maybe you’ve already heard about the project I’ve been working on for the last few weeks. It’s a project that I’ve been commissioned to make for the Made in the Adirondacks artisan show at the Adirondack Museum. I’m calling it Adirondack Dreaming; it’s my dream camp, if by dreaming you mean that I feel in to a deep daydream and this is the camp I designed! I am going for whimsical, fantastic, and rustic all at once. I hope that there will be a little for everyone in it.
The cookies get finished tonight, and displayed tomorrow. Check out my Instagram or Twitter feeds for the latest sneak peeks! (Or Facebook, if you must). Of course, when I finish I’ll post all about it here. I’ll even share what it was like to Periscope live broadcast most of the decorating!
In the meantime, I made a coloring page to accompany this set, and I love how it came out. If you like that sort of thing, please print it out! Don’t worry if the pdf looks broken up on the screen, it should print out smoothly, it’s just high resolution.